
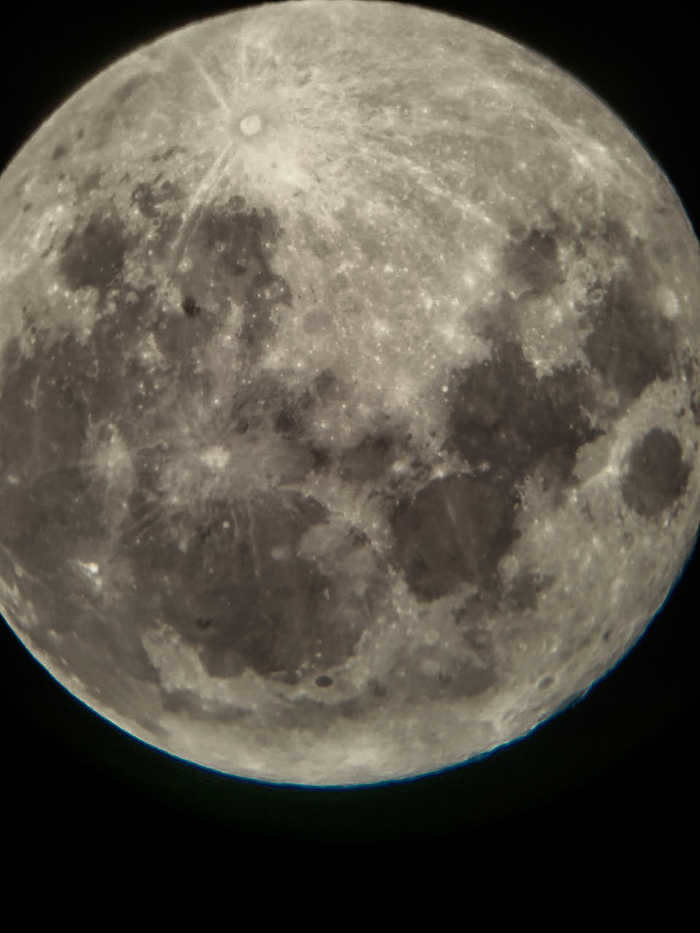
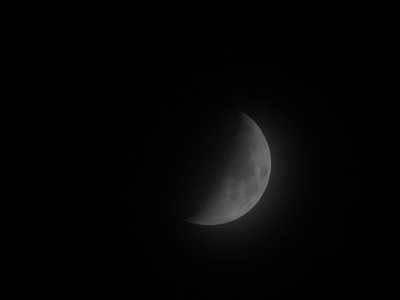
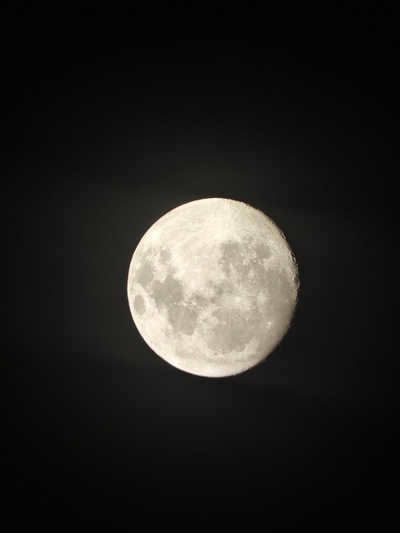
Indeed, we managed to capture a hasty snapshot of the moon using a smartphone and an eyepiece, although it may not be of the highest quality as it lacks proper focus, video recording capabilities, and post-processing techniques like enhancement and noise reduction. It was a conscious decision to engage in visual observation, something we haven’t done in a while as most of our astronomical activities have been centered around computer-based analysis and astrocameras. Nonetheless, the experience was enjoyable and we’re glad to have revisited this more traditional approach to stargazing 🙂
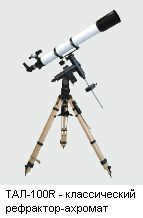
The Novosibirsk instrument-making plant produces the TAL250K, a 250 mm catadioptric system telescope with excellent optical quality.
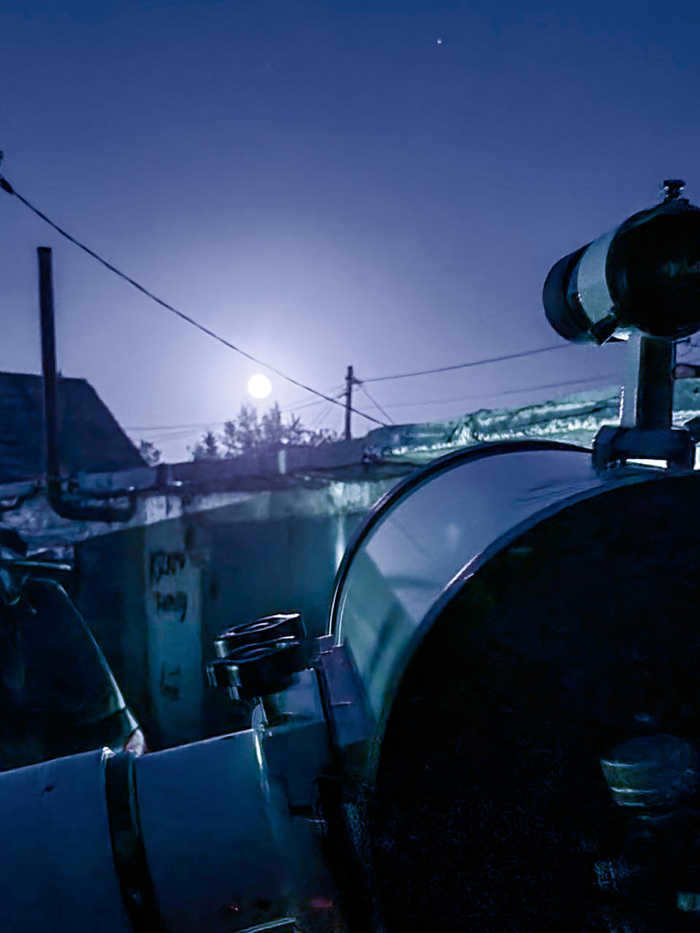
And the most important feature is that it is compact (yet with a significant focal length) – it can easily fit in a car.

There are currently 14.9K posts and 45.3K subscribers in this community.
Guidelines for the Community
Aside from the rules established by peekaboo, there aren’t any additional regulations in place.
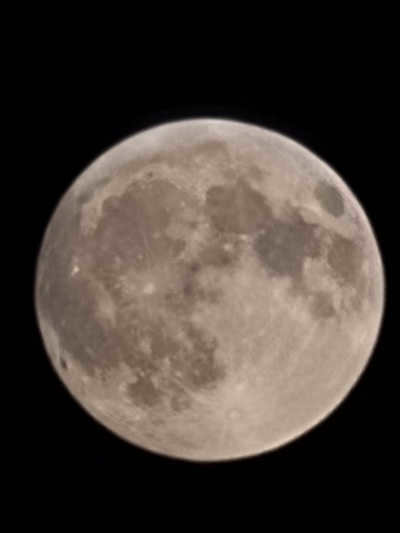
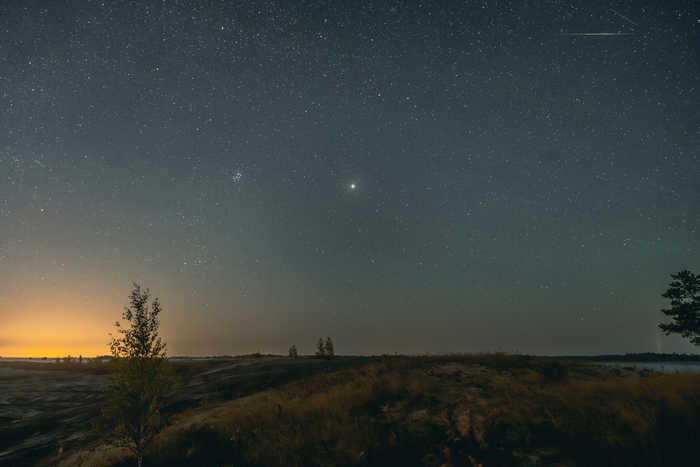
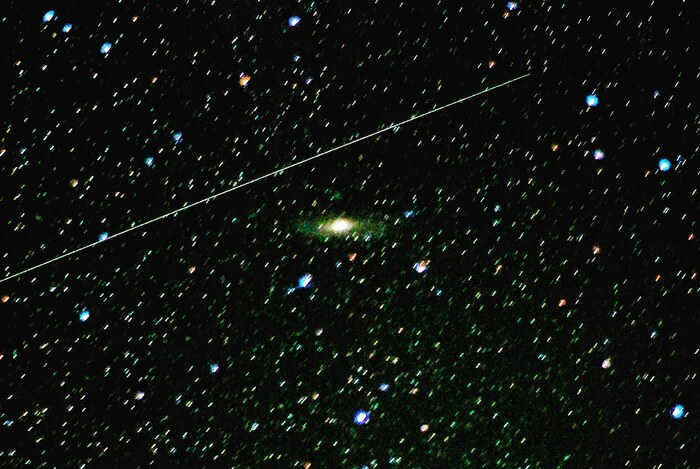
The S21 ultra, x100, handheld)
Recently, I had the opportunity to visit the city planetarium for the second time in two decades to engage in night observations. During my visit, I had the chance to observe Pulcherima, M-57, and M-3 through a Sony digital camera. It was an incredible experience.
Ever since I was a child, I have had a passion for astronomy. But have you ever wondered about the windows?
Introducing the fresh arrival: the comet C/2023 P1 (Nishimura).

Comets can be unexpected visitors. While old comets that we are familiar with can sometimes disappoint us by depleting and melting away with repeated approaches to the Sun, newly discovered comets can often be bright and spectacular. However, this is not always the case.
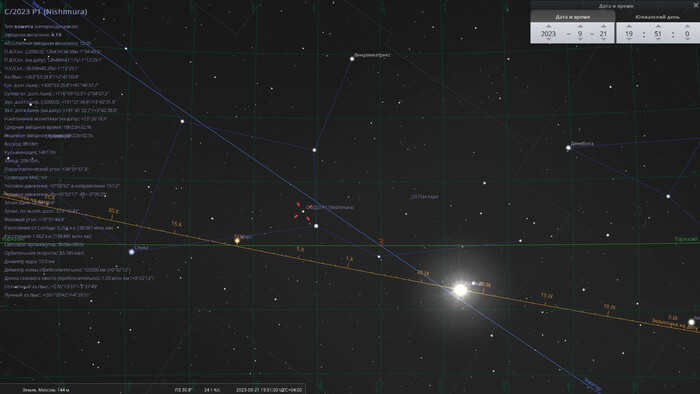
On the night of August 11-12, 2023, Japanese astronomer Hideo Nishimura discovered Comet C/2023 P1 in the constellation Gemini, where it is still located. We can consider the discovery of this comet as a stroke of luck, as finding a faint nebulous object (12th magnitude) in the brightening predawn sky is a great stroke of luck and a testament to the highest level of professionalism.
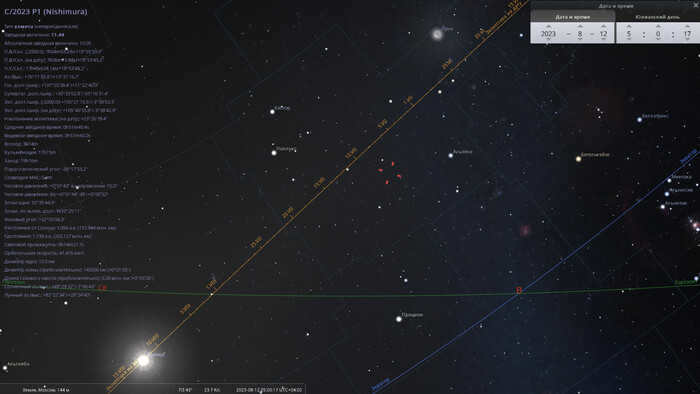
On the morning of August 12, 2023, comet C/2023 P1 was located in the Gemini constellation (at the time it was discovered).
However, the comet became increasingly brighter with each passing night. Now, just a week later, it has already outshone 10 stars. It is now visible in medium-power amateur telescopes. Although Comet Nishimura can still be observed before dawn, its overall visibility conditions have improved slightly since its discovery.
What Comes After?
By September 18, 2023, the comet is projected to reach its perihelion, the point in its orbit closest to the Sun, at a staggering distance of 33 million kilometers from its luminous surface. This distance is roughly twice as close as Mercury is to the Sun, however, it’s important to note that Mercury is a solid planet while the comet is composed of ice. Due to its icy composition, the comet will begin to melt and vaporize well before reaching perihelion. In fact, this process has already commenced, with astronomers observing a small tail (measuring only 8-10 angular minutes in length) consisting of gases and dust being emitted from the comet’s heated nucleus.

The location of comet C/2023 P1 in the constellation Gemini on the morning of August 18, 2023
Currently, the comet is in the process of crossing the Earth’s orbit and is actually on the opposite side of the Sun from our perspective. As a result, the distance between the Earth and the comet is quite significant – one and a half astronomical units. However, this situation is rapidly changing.
By the beginning of September, the distance between the Earth and the comet will decrease to one astronomical unit (and from the comet to the Sun to half an astronomical unit). The angular distance from the Sun (elongation) will decrease slightly, going from 35 to 30 degrees. However, this minor inconvenience will be offset by the increasing difference in declination between the Sun and the comet. In fact, the comet’s tail will be visible directly above the Sun, allowing for clear visibility even before sunrise.
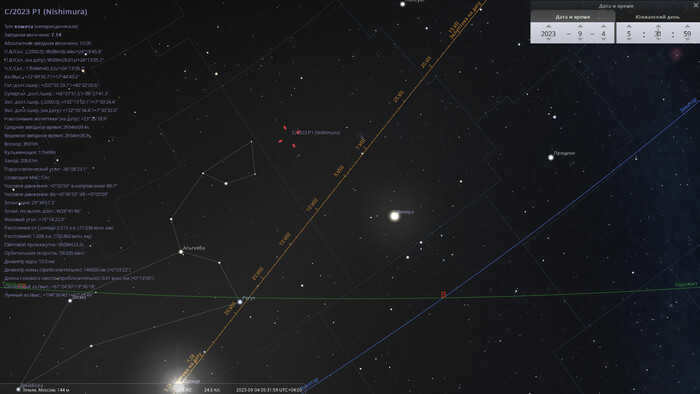
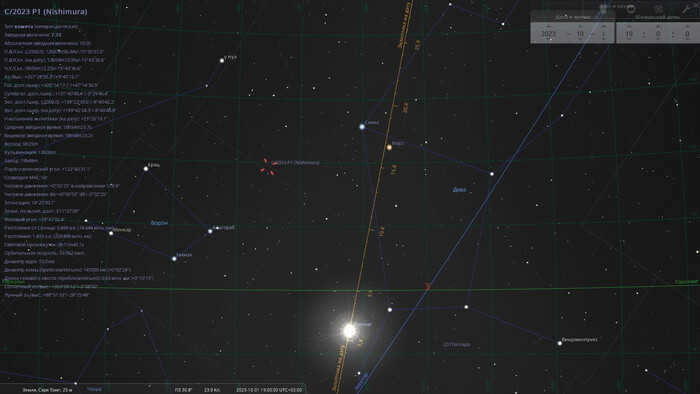
On the morning of September 4, 2023, in the constellation of Cancer, you will find comet C/2023 P1.
In the night sky, you can spot Comet C/2023 P1 Nishimura in the constellation of Cancer, near the border with Leo (look for the asterism known as the “Lion’s Head” as a helpful guide). Additionally, the bright Venus will also be shining in the same constellation. On September 4, 2023, the comet will have a magnitude of 7, making it an easily observable object with binoculars.
On September 9, 2023, in the morning, the comet C/2023 P1 will be positioned 1 degree to the west of the star Adhafera (Zeta Leo), with a brightness of 6 star magnitude. Under optimal conditions, such as in mountainous, desert, or steppe areas, the comet will be visible to the naked eye.
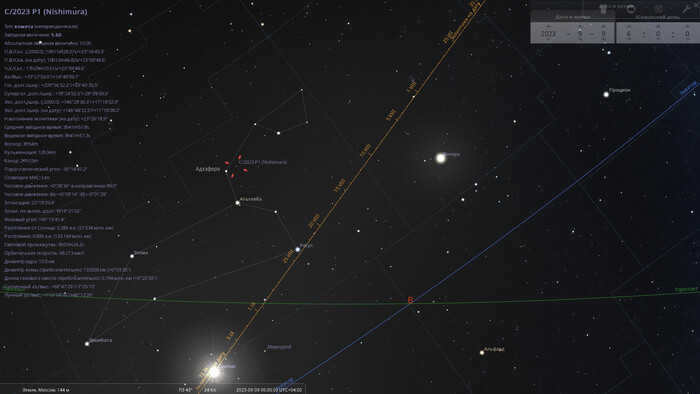
On the morning of September 9, 2023, the position of comet C/2023 P1 can be found in the constellation Leo.
Regrettably, the distance from the Sun will decrease to 22 degrees, but the comet will rise even higher above the ecliptic. Despite this small elongation, the comet will remain visible for at least one and a half to two hours.
In the coming days, the comet’s brightness will continue to increase, but its distance from the Sun will decrease, making observation more challenging.
During the morning of September 12th, the comet’s brightness will reach a magnitude of 5 stars, while its elongation will decrease to 17 degrees. Simultaneously, the comet will remain visible above the Sun, providing an opportunity to locate it in the early morning twilight near the star Zosma (Delta Leo).
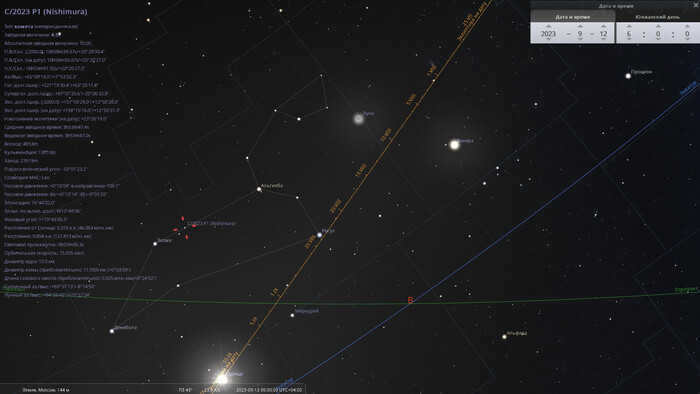
The location of comet C/2023 P1 in the constellation Leo will be observed on the morning of September 12, 2023.
By September 15, the comet will approach the 2nd magnitude star Denebola (Beta Leo). At that time, the comet will be slightly dimmer, around 3rd magnitude. However, it will still be challenging to spot both objects against the brightening sky at dawn.
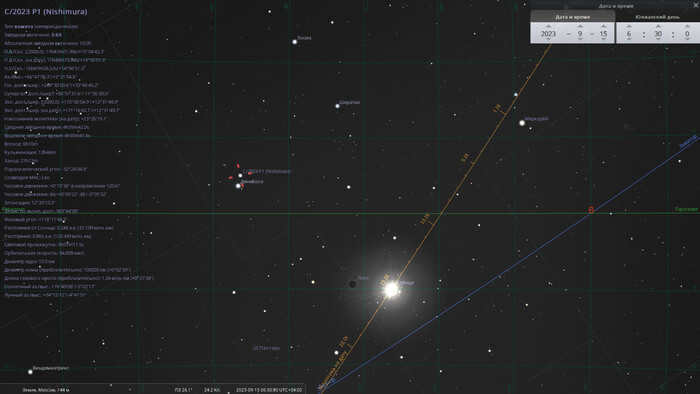
The constellation Leo is where the comet C/2023 P1 can be found on the morning of September 15, 2023.
During perihelion, the comet is expected to have a brightness of approximately 2nd magnitude. In the evening, just a few minutes after dusk, observers in the northern hemisphere will be able to see the comet in the northern part of the constellation Virgo. However, in the southern hemisphere, it will be either impossible or extremely challenging to spot the comet, as its declination is still significantly higher than that of the Sun.
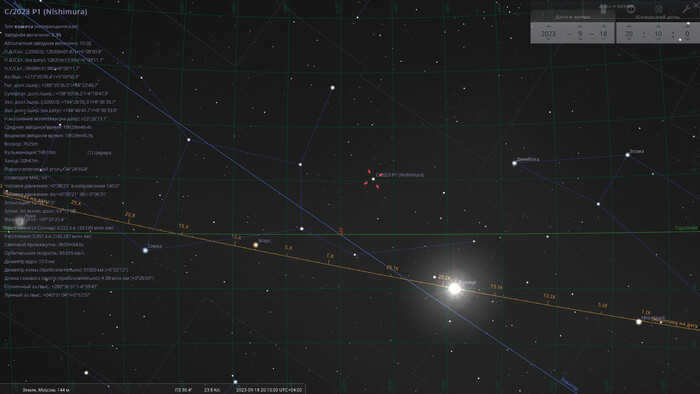
The constellation Virgo will be the location of comet C/2023 P1 on the evening of September 18, 2023 (when it passes perihelion).
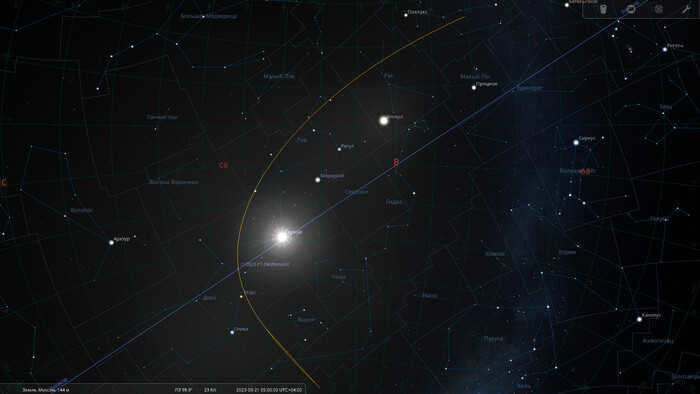
As time goes on, the comet will gradually move further into the southern celestial hemisphere and will cross the equator at the same time as the Sun – which will occur the day before the autumnal equinox on September 21, 2023. The comet’s brightness will decrease to 4.5m.
The position of comet C/2023 P1 on the evening of September 21, 2023 in the constellation Virgo
On the evening of October 1, Comet C/2023 P1 Nishimura can be observed 40 minutes after sunset in the border region of the Virgo and Corvus constellations. However, to do so, one would have to be located in Australia, the mid-latitudes of South America, or possibly the southern tip of Africa. The comet’s brightness is expected to be around 7.5m, so it may not be worth purchasing tickets solely for the purpose of viewing it.
The position of comet C/2023 P1 on the evening of October 1, 2023 at the border of the Virgo and Corvus constellations (for an observer situated in Cape Town, South Africa).
By the middle of October, the comet will continue its journey southward – entering the tail region of the Hydra constellation. Its brightness will diminish to the 10th magnitude, making it difficult to observe even in the southern hemisphere. In fact, at this stage, visibility of the comet will cease for astronomy enthusiasts worldwide.
Not under our surveillance. At this juncture, the orbital parameters have only been estimated roughly. This level of precision is sufficient for extrapolating the comet’s celestial coordinates over the forthcoming few months, but the duration of its orbital cycle remains a mystery. In spite of the classification of the comet as long-periodic, the eccentricity of its orbit is deemed to be one, implying that the comet’s trajectory is almost parabolic or potentially even is such, signifying that it will eventually return to the Sun, whether that occurs in a million years or never at all.
The path of comet C/2023 P1 Nishimura from August 12 to November 1, 2023
All maps were created with the Stellarium software
Commencement of astro-season
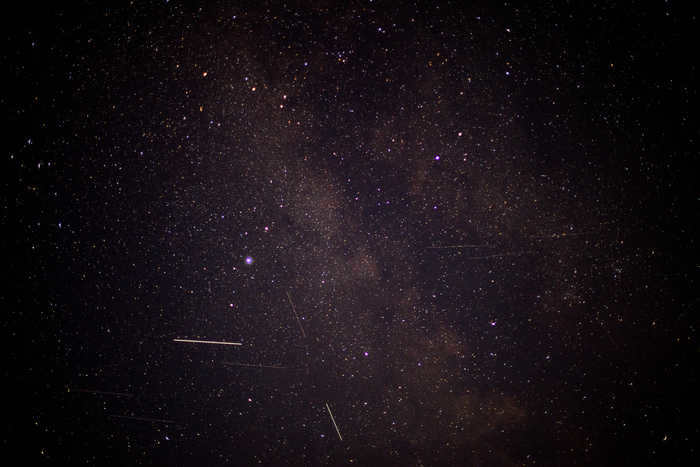
Our region is gradually descending into darkness, allowing us to fully embrace the season. It may be a tad premature as the nights are not completely dark yet, but it is not quite daytime either. Nonetheless, it presents the perfect opportunity for me to put my new camera to the test amidst its natural surroundings. The Perseids meteor shower, once again, aligns perfectly with a day off, a relatively moonless night, and clear skies. This provides us with the ideal conditions to venture out into the fields.
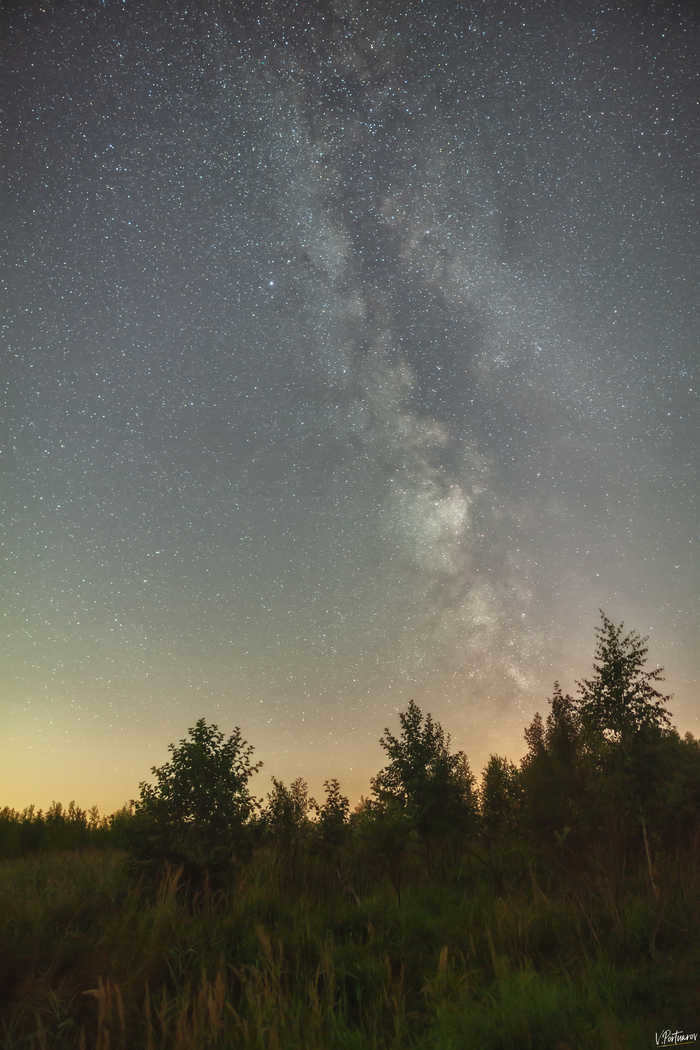
I commenced my astro-photography journey with the Milky Way, as it is currently in one of the most favorable positions for our location. Its nucleus even protrudes slightly, adding to its allure.
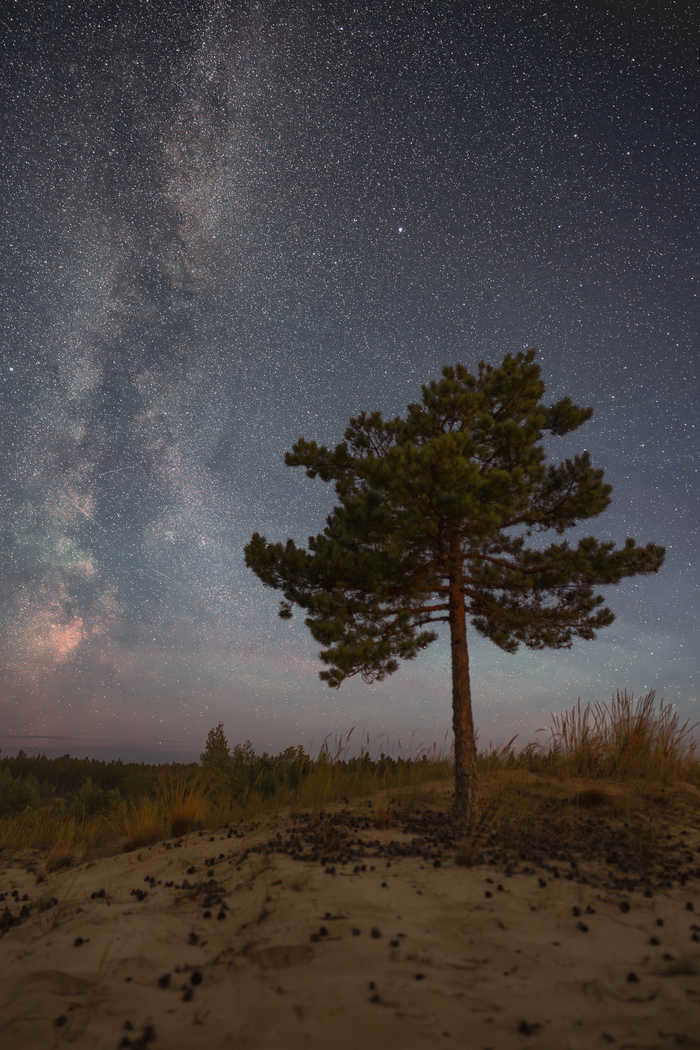

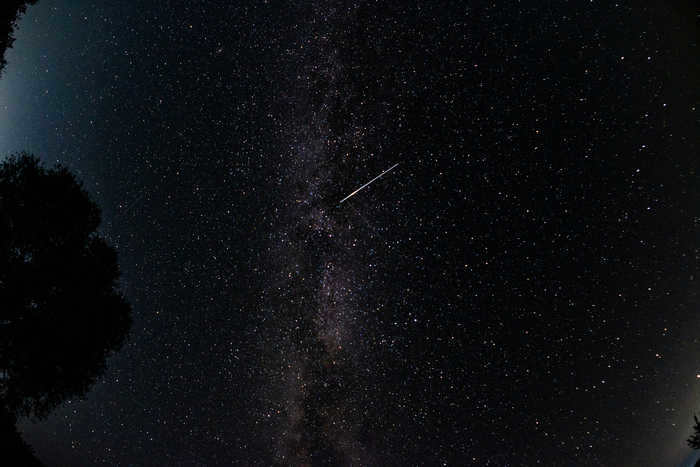
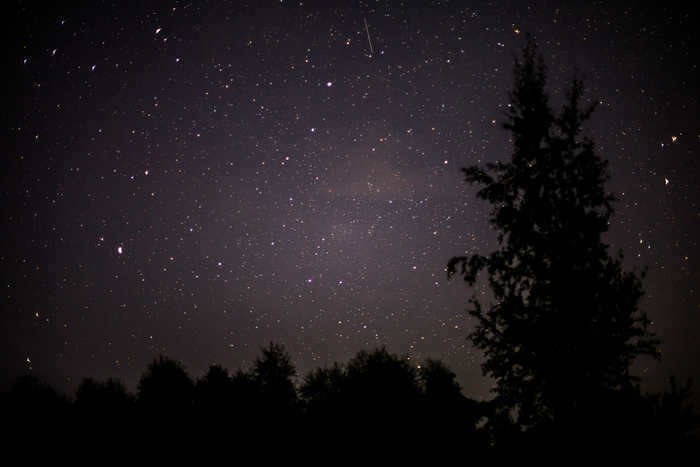
Last night, the Perseids were at the peak of their activity. While meteors were not flying every minute, there was a guaranteed sighting every five minutes. It’s unfortunate that these sightings occurred either during the gaps between frames or during camera malfunctions. However, some meteors did manage to make it into the captured frames.
Here are some of the most vibrant meteors that were captured on camera. The quality of the photos may not be the best, but it’s a case of “proof or it didn’t happen.” And who knows when there will be another opportunity like this in the next few years.
The Sony A7III and Sigma Art 20mm F/1.4 DG DN were used to capture these stunning images. Various settings were utilized, with a focus on a 15-second exposure time, ISO 8000, and an aperture ranging from F1.4 to F1.6. Post-processing was done in Lightroom and Photoshop to enhance the final results.
Galaxy of the Orion Constellation
There are 10 amazing photos taken of the beautiful Milky Way galaxy in the constellation of Orion. The shutter speed was set to 15 seconds and the ISO was set to 3200. These stunning photos were captured using a Samsung s20fe camera in the Southern Urals, known for its green zone.
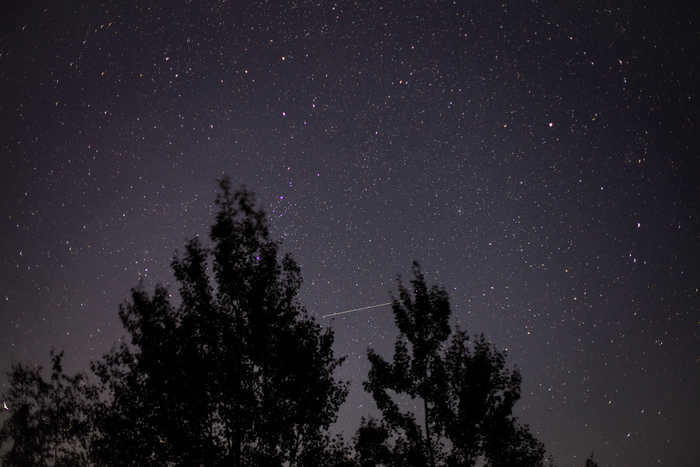
Perseids meteor shower
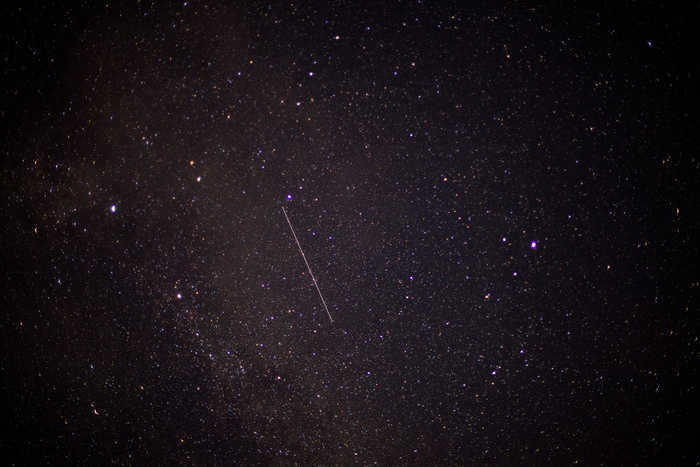
I wanted to show you the outcome of spending 4 hours getting bitten by mosquitoes in the fields of Belarus. Unfortunately, I only managed to capture one meteor with a cheap Chinese fisheye lens. The rest of the photos were filled with satellites.

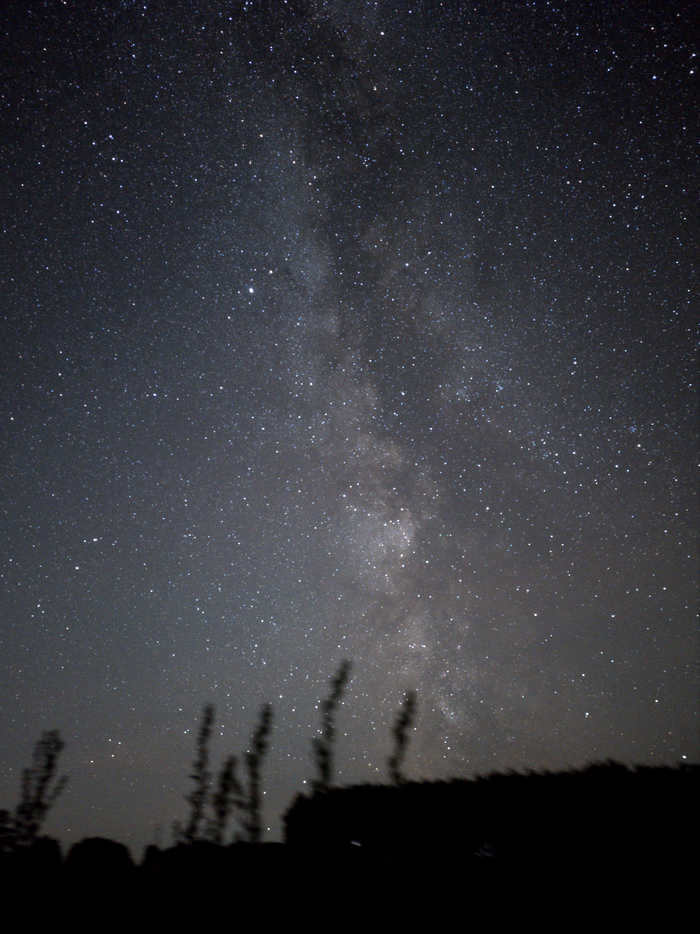
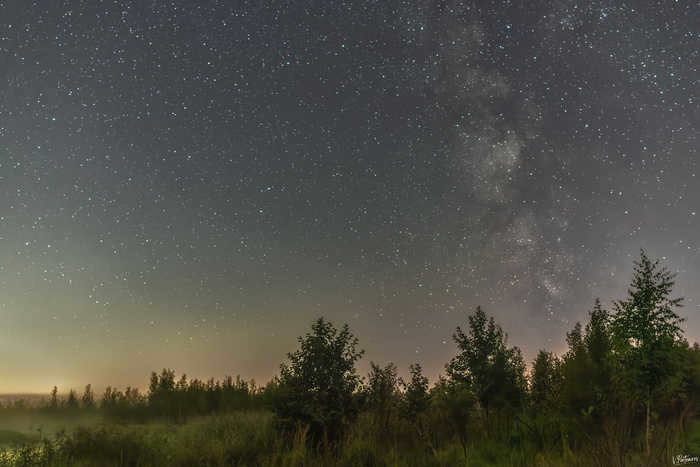
Exploring the Wonders of the Milky Way
Ilmen Lake under a canopy of stars
The Calm of the Night
Cassiopeia
Cassiopeia is a constellation located 80 km from Minsk. I captured this stunning image using a Nikon d80+ Nikkor 50mm 1.8 lens.

Andromeda Galaxy
I made my first attempt to capture a photograph of the Andromeda Galaxy using a telescope, but unfortunately, it did not go as planned. During a 30-second exposure, a dark cloud obstructed the view, causing some frustration. However, I managed to take a much better photo using a tripod and a 50mm lens. If anyone has experience with astrophotography using a telescope, I would greatly appreciate some advice on the correct method. I am currently using a Celestron 70lt az, which is a budget-friendly option.
The most desirable plots of land in our solar system
The Soviet Union launched the first artificial satellite in 1957, a fact that is well known to all. Since then, numerous space agencies, private companies, and research institutes have been increasing their presence in the solar system. Over the years, they have conquered numerous frontiers, making it impossible to compile a comprehensive list. While there seems to be ample space in this vast expanse for everyone, certain areas of “real estate” are undeniably more enticing than others. One such example is the Lagrange points, which have captured the attention of all interested parties. These points, named after the 18th-century mathematician who determined their location, offer valuable islands of stability in our ever-changing and turbulent corner of the cosmos.
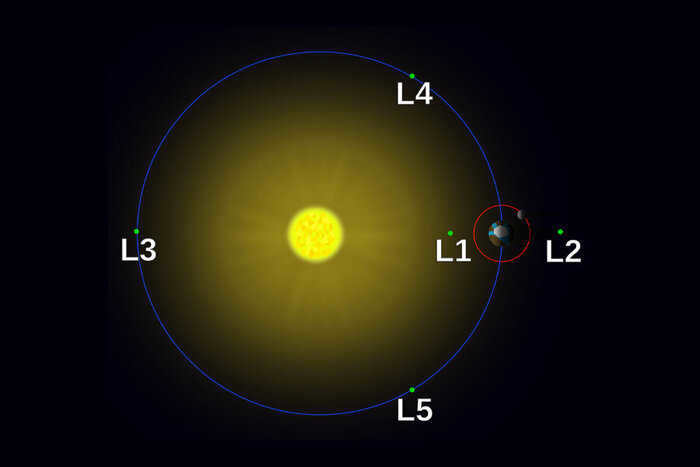
Every celestial object exerts gravitational forces on one another. The effects are particularly noticeable on objects that are close by. In these systems, other forces also come into play, determining the shape of the orbits of the “participants in motion”. At Lagrangian points, these forces are in equilibrium. Therefore, if a relatively small object is placed there, it will remain at a constant distance from the bodies that create stability islands. These zones are metaphorically referred to as cosmic parking lots: once an object is inside them, the need to expend energy to remain there practically disappears. In general, this is an ideal location for any man-made object intended to remain in space for an extended period of time.
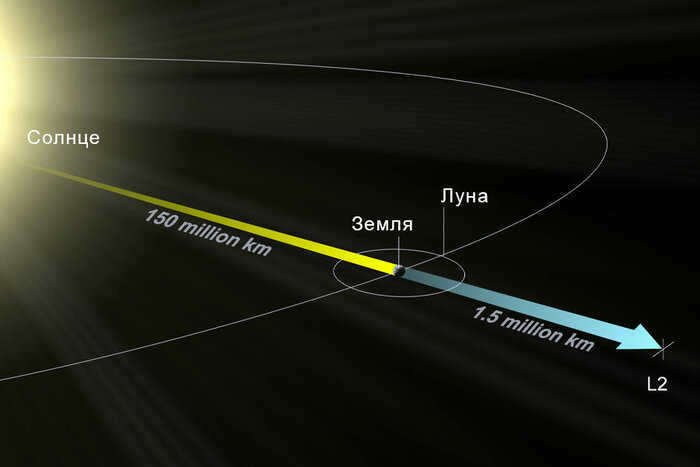
The issue of what can be placed in a specific Lagrange point is quite fascinating. Let’s take a look at the ones formed by the gravitational interaction between the Sun and the Earth. L1 is situated approximately 1.5 million kilometers from our planet, between these two celestial bodies. Because there is never any obstruction to the view of the star, it serves as a perfect spot for observing the Sun.
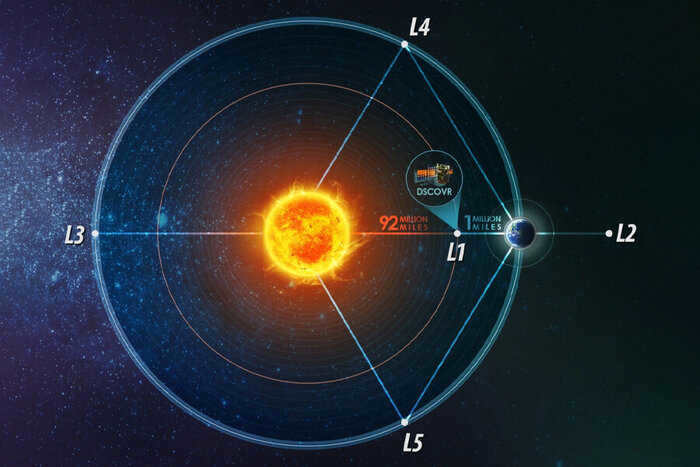
The Deep Space Climate Observatory is a spacecraft from the United States that observes the sun and Earth. It is currently positioned at Lagrangian point 1.
Lagrangian point 2 (L2) is located on the opposite side of the Earth and at the same distance. This strategic positioning allows the spacecraft to be shielded from direct sunlight, making it an ideal location for observing space. In 2022, the long-awaited James Webb telescope began its operations at this location, fulfilling the dreams of astronomers who have been anticipating its launch for two decades.
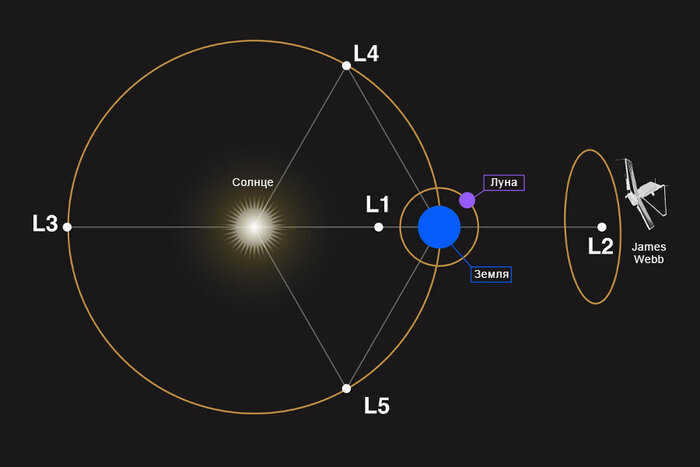
Located in the most enigmatic region, on the antipodal side of Earth’s orbit in relation to the Sun, lies L3. This specific point in the cosmos remains perpetually hidden from view, even in theory, from the planet’s surface. As a result, it serves as a constant source of inspiration for science fiction authors, while scientists, on the other hand, find it of limited practical value.
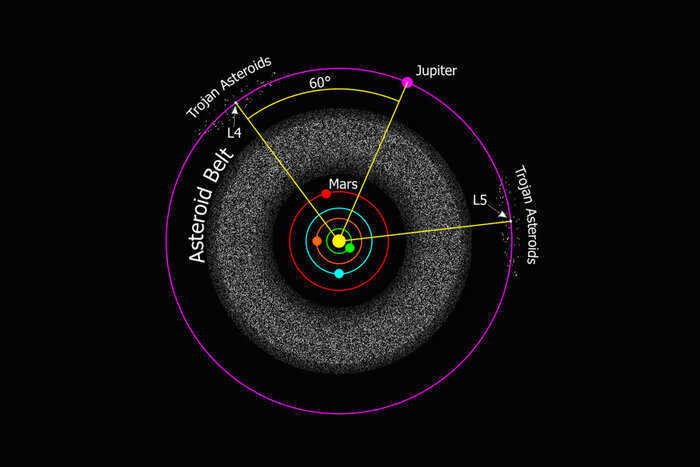
L4 and L5 exhibit some differences compared to the previous Lagrangian points. The key distinction lies in the fact that the first three points in each set of Lagrangian points have a slight instability, causing the objects within them to gradually shift. While it is possible to maintain their position if desired, it requires additional effort. In certain pairs of celestial bodies, the stability of L4 and L5 may not be particularly high, especially if their masses differ by less than a factor of 25. However, in the case of the Sun-Earth system, where the star is significantly heavier than the planet, these points demonstrate remarkable stability. Furthermore, they seem to have a gravitational pull on various objects – this phenomenon is particularly evident in the Sun-Jupiter system, where thousands of asteroids have gathered around L4 and L5.
Each Lagrangian point in the solar system possesses its own unique characteristics. Some of them can serve as a source of building materials, assuming that drifting asteroids can be considered as such. Others could potentially serve as refueling stations, where spacecraft venturing into the depths of space could replenish their fuel supply. It is even conceivable that human settlements could be established in these regions. Of course, this is a prospect for the distant future, one which we may not witness given the current state of affairs on Earth. Nonetheless, it is always pleasant to indulge in dreams, isn’t it?
We deeply value every single one of our readers. If you wish to provide us with financial support (through the button provided below), your name or nickname will be included in the credits of our upcoming post. This is our humble gesture to express our gratitude for your generosity and encouragement!

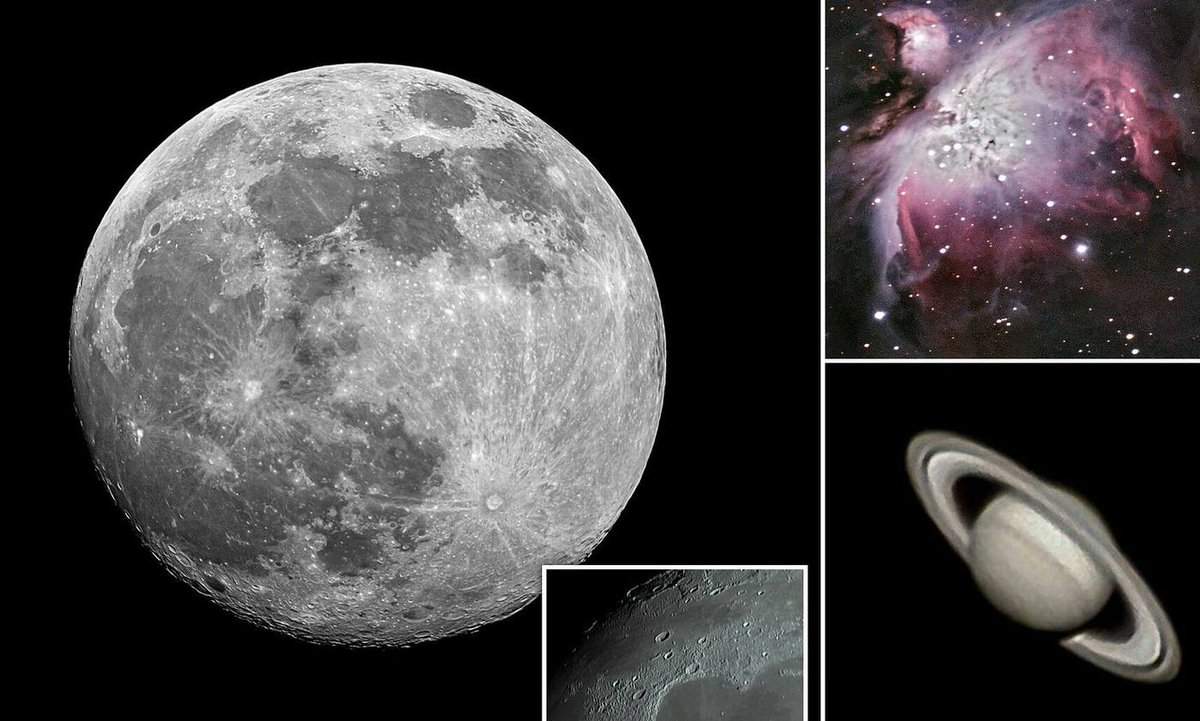
Exploring the Moon: Is it possible to spot meteors, eclipses, auroras, and comets while observing the moon? What is the optimal time to observe these celestial events? Learn about the different cycles and phases of the Moon, discover a detailed map of the lunar surface, and find out how telescopes and filters can enhance your lunar observations.
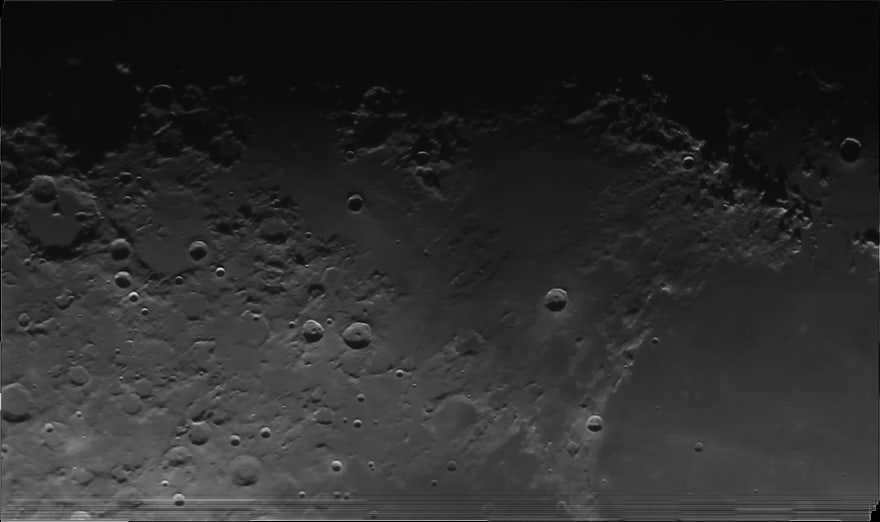
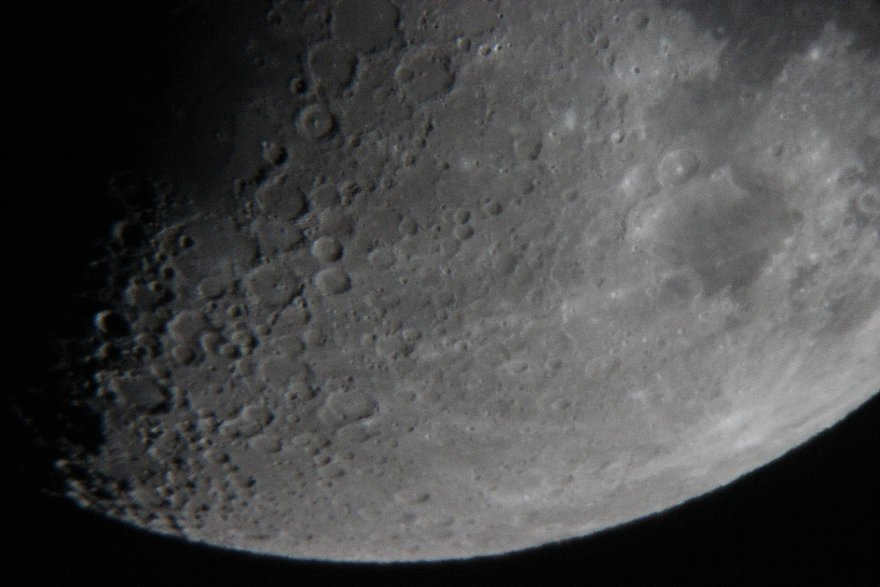
The Moon appears to be the most easily observable celestial object in the sky. At times, it takes on the shape of a slender crescent, while other times it completely vanishes, and on certain days it radiates as a massive sphere, outshining the stars. These are not whims of the heavenly body, but rather the various phases of the Moon and its changing distance from Earth as it orbits the planet in an elliptical path. We have grown accustomed to this nocturnal companion, often giving it little attention except during lunar eclipses. However, the Moon conceals a multitude of intriguing features. Below, you will discover the optimal times for moon-gazing, the possibility of spotting meteors, and the fascinating entities that reside on its surface. And at the very end, marvel at astonishing photos showcasing the Moon’s craters and seas. Let it not slip your mind that you can also employ telescopes or observe the Moon in real time through online channels.
The Moon, Earth’s only natural satellite, shines as the most brilliant object in the night sky. Its gravity is six times weaker than that of Earth, and the temperature fluctuates by over 300˚C between night and day. The Moon completes one rotation around its axis every 27.3 Earth days. During this time, its rotational trajectory and angular velocity remain constant, matching its speed of revolution around the Earth. As a result, an observer from Earth can only see one hemisphere of the Moon, while the other side (known as the back side) remains perpetually hidden from view.
Optimal Time for Moon Observation
Despite initially sounding nonsensical, the veracity of this claim is supported by the vast experience of countless observers. The full moon phase is actually an unfavorable time to study the Moon, as the contrast of surface details diminishes significantly, making examination nearly impossible. However, there are two specific periods within the lunar month that are highly conducive to exploration. These periods occur after the new moon, extending until two nights after the first quarter. During this time, the Moon is beautifully visible in the evening sky.
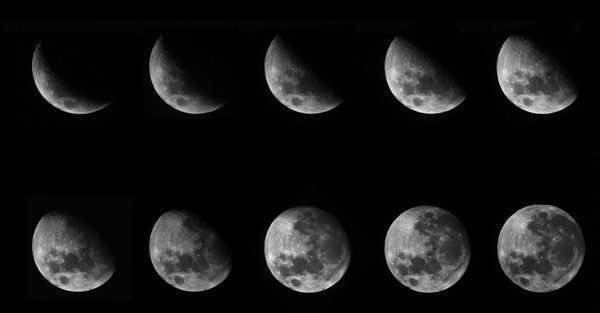
The second phase commences a few days before the final quarter and concludes at the time of the new moon. During this period, the elongated shadows of the Moon become distinctly visible on mountainous landscapes. Moreover, the morning atmosphere is relatively calm, resulting in a clear and steady image with an abundance of intricate details.
It is worth noting that the Moon’s altitude above the horizon also plays a significant role. As the Moon’s position lowers, the denser air interferes with the moonlight, leading to increased distortion and a decrease in picture quality. The satellite’s height above the horizon varies throughout the seasons.
| 3 days | First quarter | Full Moon | Last quarter | 25th day |
| End of April | Vernal Equinox | Winter Solstice | Autumnal Equinox | End of July |
| End of October | Autumnal Equinox | Summer Solstice | Spring Equinox | End of January |
Before conducting observations of the moon, it is recommended to determine the optimal visibility time using any planetarium software.
The Moon’s path around the Earth follows an elliptical shape. The average distance between the centers of the Earth and the Moon is 384,402 km, however, this distance is constantly changing, ranging from 356,410 to 406,720 km. As a result, the Moon’s apparent size also fluctuates, measuring 29′ 22” at its farthest point (apogee) and 33′ 30” at its closest point (perigee).
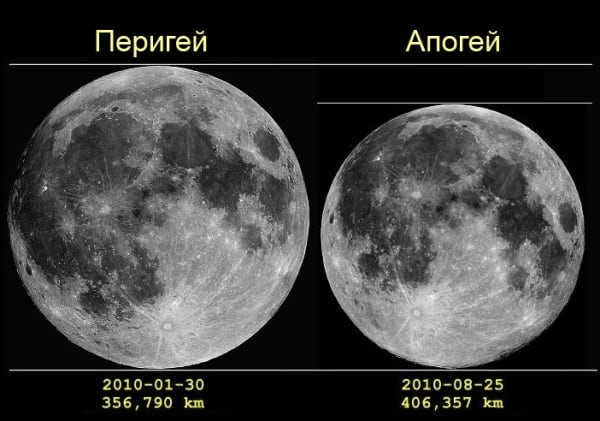
When observing the Moon, it is important to note the difference in apparent size. Rather than waiting for the Moon to be as close to the Earth as possible, it is advisable to take advantage of the perigee, when the Moon is closer and allows for a more detailed study of its surface.
To begin your observation, direct the telescope towards any point near the terminator, which is the line that separates the light and dark halves of the Moon. During the waning phase, the terminator indicates the location of sunset, while during the waxing phase it points to the place of sunrise.
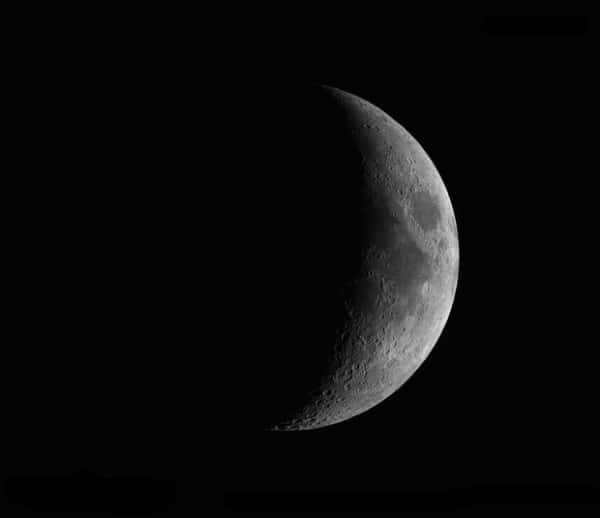
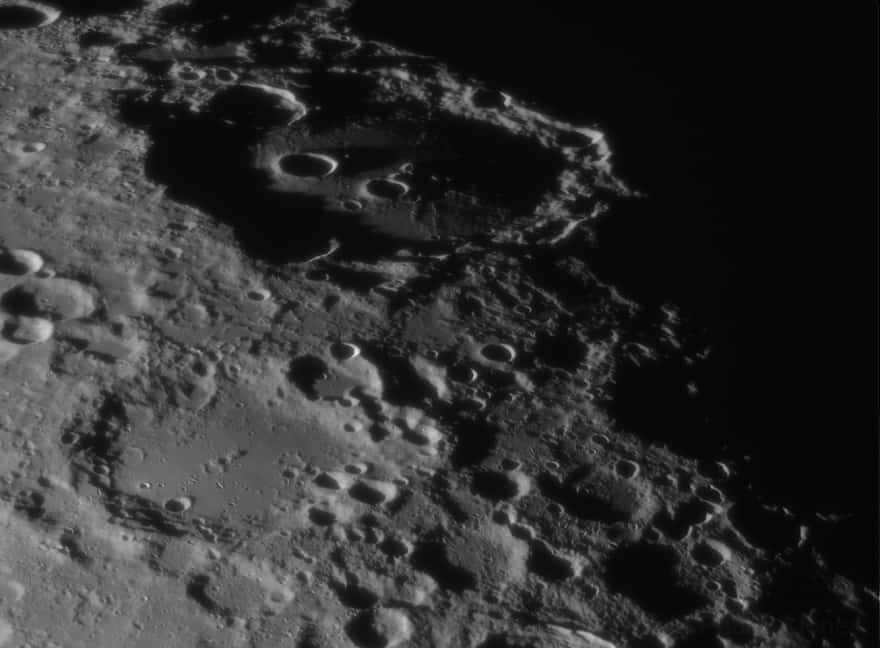
Here is a unique photo of the Moon taken with an amateur telescope. This particular image was captured using a 125-mm refractor.
When observing the Moon at the terminator, researchers have the opportunity to examine the structure of the mountain peaks that are illuminated by sunlight. Meanwhile, the lower parts of the mountains remain in shadow. The landscape along the terminator line is constantly changing in real time. Therefore, dedicating hours to observing this celestial landmark will be well worth it, as it offers a magnificent spectacle.
Important note! When observing the Moon between the last or first quarter and full moon phases, it is advised to have a moderately bright white light turned on behind you. However, make sure the light source is not directly in your line of sight, causing eyestrain or glare on the eyepiece. This will help maintain better daytime vision and allow you to see the multitude of details on the Moon’s surface.
Essential Equipment
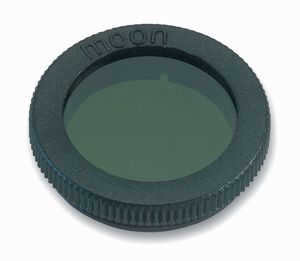
In order to observe the Moon and capture high-quality photos, it is crucial to have the right telescope. The Moon emits a very bright light, which can be overwhelming when viewed through a telescope. However, there are various methods to make the observation more comfortable by reducing the brightness of the Moon. One option is to use a polarizing variable density or neutral gray filter. The former is more preferable as it allows you to adjust the level of light transmission (ranging from 1% to 40%). This is particularly convenient because the intensity of the lunar glow depends on its phase and the magnification being used. On the other hand, using a neutral filter will result in a constantly changing image of the Moon, varying from excessively dark to excessively bright.
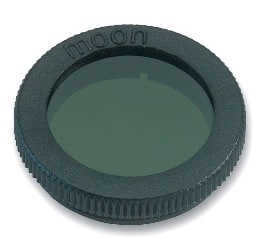
The Celestron Lunar Filter is a great tool for observing the Moon in a telescope. It has a variable brightness feature that allows you to adjust the brightness to your desired setting.
Usually, colored filters are not commonly used when observing the Moon. However, the red filter can be an exception as it can enhance the contrast of areas with high basalt content. Additionally, it helps stabilize the image in an unsteady atmosphere and reduces lunar brightness.
If you’re planning to study the Moon, it’s recommended to have a lunar atlas or map. You can also use the Virtual Moon Atlas app, which provides comprehensive information to help you prepare for your lunar exploration.
Get started with the simplest map of the lunar surface.
For astronomers with expertise, there is a more comprehensive lunar map available that displays all surface formations:
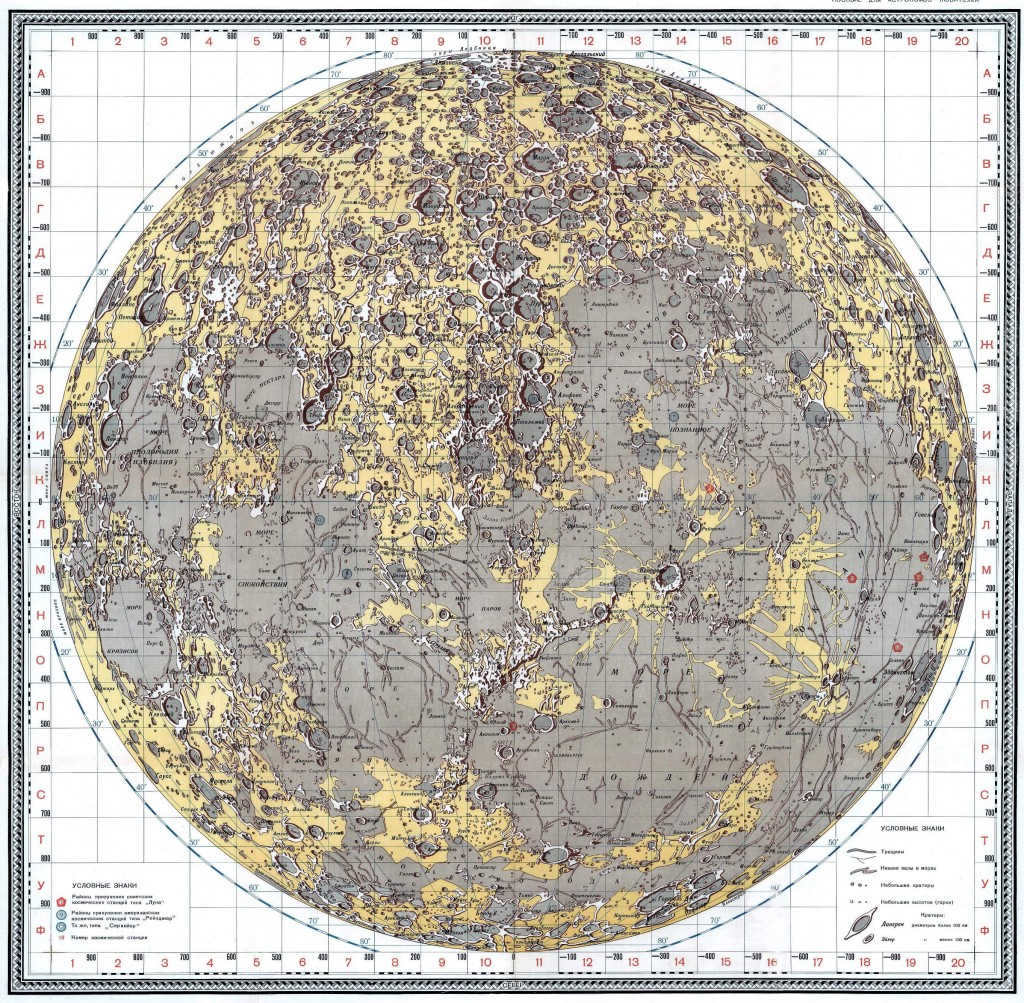
Get the download link here (Image Size: 2725 x 2669, Weight: 1.86 mb).
Exploring the Moon with Different Equipment
Due to its proximity to Earth, the Moon is a favorite subject for astronomy enthusiasts who enjoy observing it with both the naked eye and specialized equipment. Even without any tools, you can still notice the Moon’s distinct ashy color, which is most noticeable in the mornings when the Moon is waning and during evening twilight when it is waxing. Furthermore, the overall features of the Moon are easily observable.
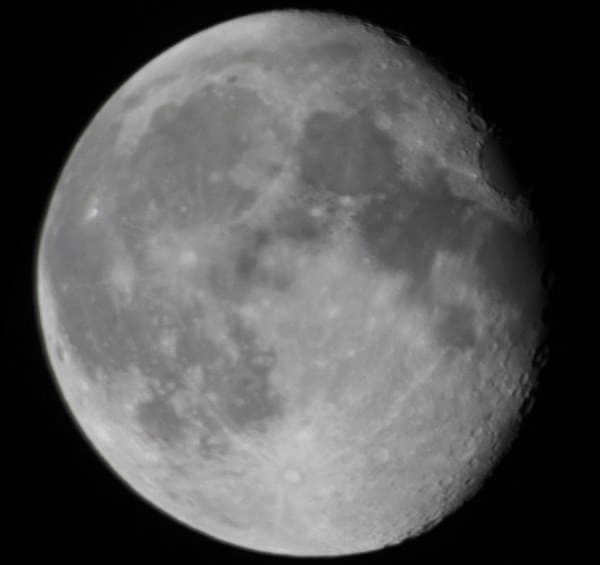
Using a 114mm telescope and a 2x Barlow lens, I was able to capture an image of the Moon.
If you have a small telescope or binoculars, you can observe the Moon’s craters, seas, and mountain ranges up close. There are plenty of fascinating things to discover!
By using a telescope with an aperture of 200-300mm, you can delve even deeper into the lunar landscape. Explore the intricate details of large craters, examine the structure of mountain ranges, and observe the numerous folds, furrows, and chains of small craters.
This photograph was captured using the 279-mm Celestron C11 XLT telescope.
Determining the capabilities of each specific telescope can be quite challenging due to the influence of atmospheric conditions. On most nights, the maximum resolution of a large telescope is limited to 1″. However, there are occasional moments of atmospheric calm that last only a few seconds. During these brief periods, observers must push their equipment to its limits. For instance, on a clear and calm night, a 200-millimeter telescope can reveal craters with a diameter of up to 1800 meters, while a 300-millimeter instrument can reveal craters with a diameter of up to 1200 meters.
How to Observe the Moon
When it comes to observing the Moon, it is common practice to focus on the terminator, as this line provides a higher contrast of lunar details. The interplay of shadows adds a touch of magic to the lunar landscape. Don’t be afraid to experiment with different magnifications to find what works best for your specific observing conditions. It is often recommended to have a set of three eyepieces on hand.
A search eyepiece, which offers a lower magnification, is perfect for comfortably exploring the entire lunar disk and taking in the sights of the satellite’s surface. It can also come in handy for observing lunar eclipses and organizing lunar excursions for your friends.
The medium magnification eyepiece (ranging from 80x to 150x) is the most popular choice and proves extremely useful in unstable atmospheres.
The professional lunar exploration requires the use of a powerful eyepiece (2D-3D) that utilizes the full potential of optical technology. This eyepiece can only be employed under optimal atmospheric conditions and when the telescope is completely thermally stabilized.
Observe the moon through a 300mm telescope and two Barlow lenses.
Enhance your observing effectiveness with Charles Wood’s compilation of the “100 Best Moon Objects”. Additionally, explore the Unknown Moon series to gain insights into the various landmarks on the moon’s surface.
You may find yourself engrossed in the search for minuscule craters that are only visible at the far reaches of your telescope.
Remember to maintain a journal of your observations. Use designated sections to note the time and phase of the moon, observation conditions, atmospheric conditions, and the magnification utilized. You can also include sketches here.
Things to Look Out For on the Moon
The Moon’s surface is covered with numerous craters, which are often referred to as “bowls” due to their shape. These craters are primarily formed by the impact of celestial bodies on the satellite’s surface.
The moon’s appearance in a telescope is altered by the presence of lunar seas. These vast, low-lying areas cover nearly 40% of the visible surface and create a striking contrast with the rest of the moon. Interestingly, during a full moon, these dark spots create the illusion of a “face” on the lunar surface.
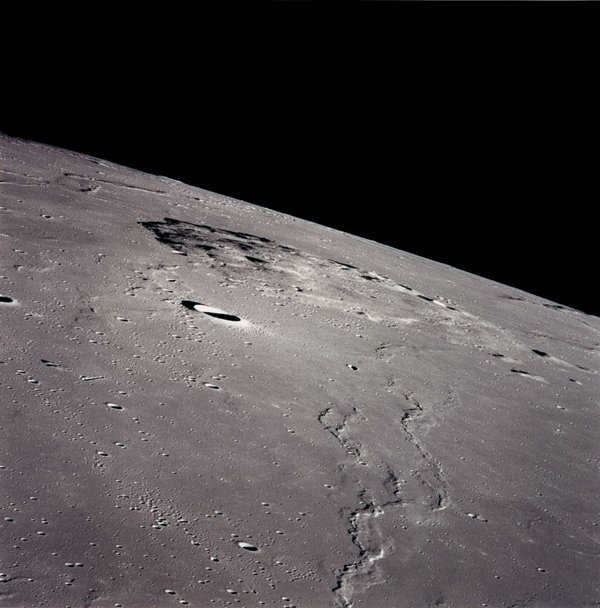
Ravines, also known as lunar valleys, can be found on the surface of the Moon. These geological formations stretch for hundreds of kilometers, with a width of 3500 meters and a maximum depth of 1000 meters.

Rippled veins – resemble cords. They come into existence due to compression and deformation caused by the sinking of the seas.
Mountain ranges – are elevated areas on the lunar surface. Their altitude ranges from 100 to 20000 meters.
Domes are a genuine enigma of the Moon. There is currently no conclusive information about their origin. At present, there is data on a few dozen domes, which are small (up to 15 km in diameter) smooth and circular elevations.
Top 10 fascinating lunar entities
Rainbow Bay (Sinus Iridum) T (lunar age) – 9, 23, 24, 25.
The Bay of Rainbows, also known as Sinus Iridum, is situated in the northwestern region of the Moon. It can be easily observed even with binoculars at a magnification of 10x. When viewed through a medium magnification telescope, it appears as a stunning object with a diameter of 260 km and slightly blurred edges. The flat bottom of the bay is adorned with a scattering of small craters.
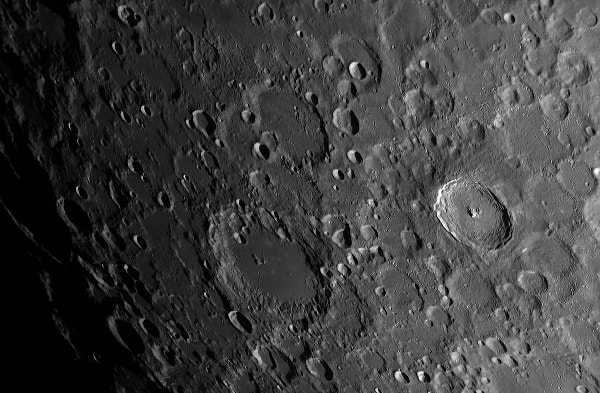
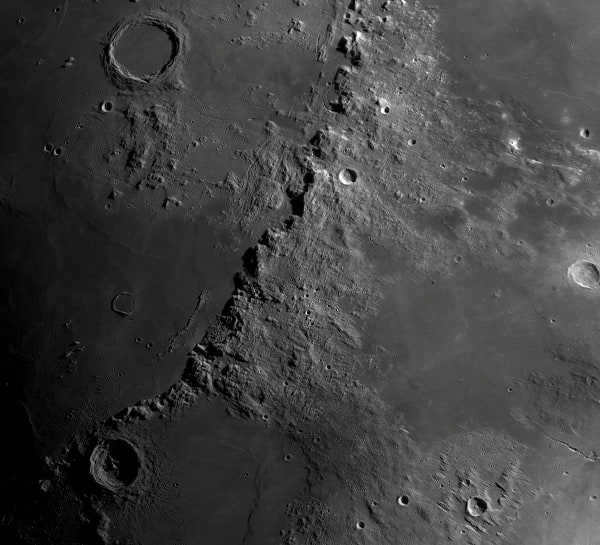
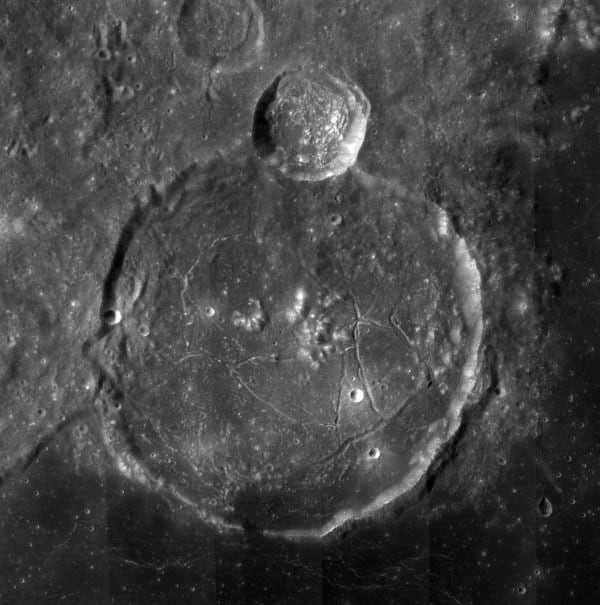
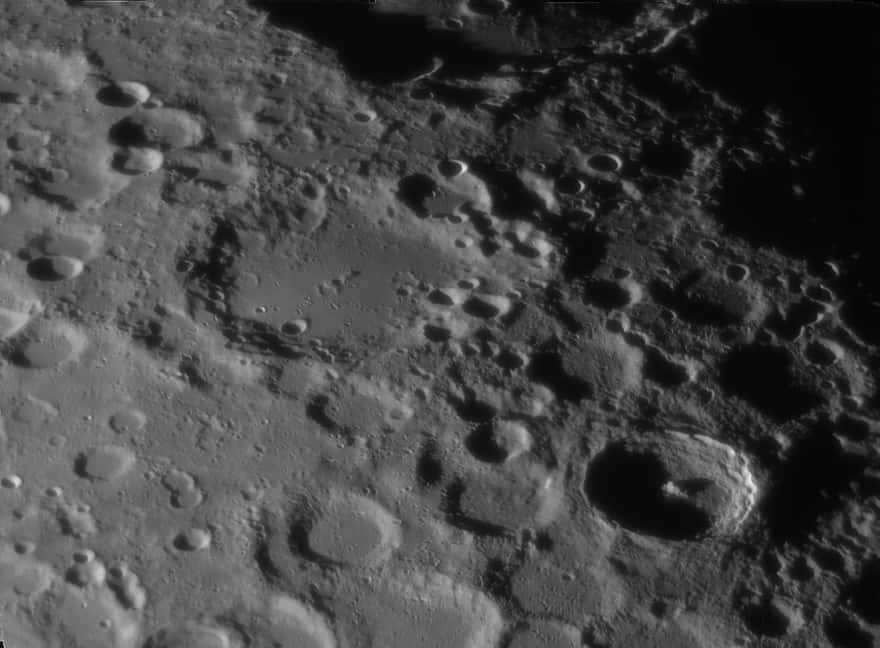
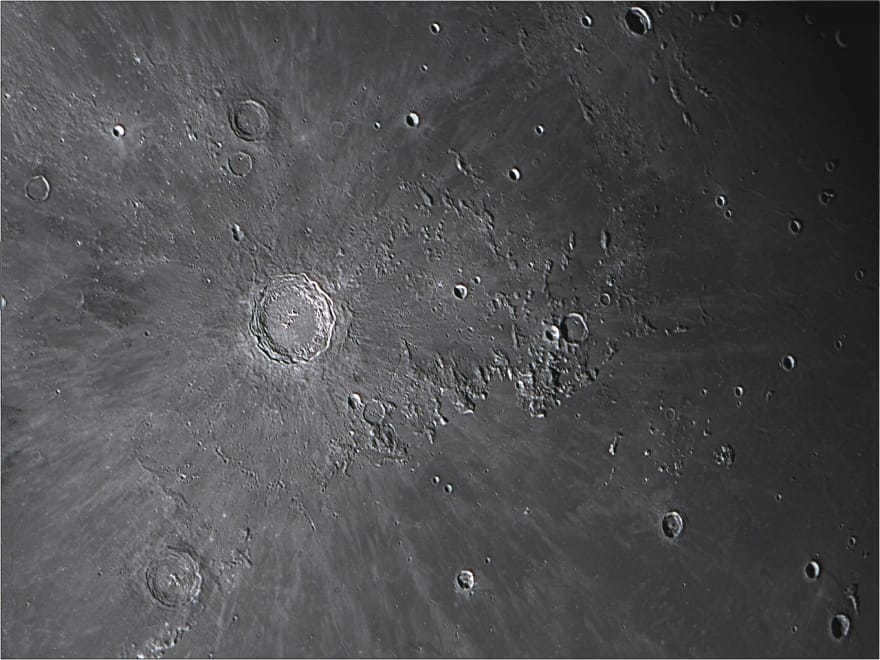
One notable feature in this area is the Crater Copernicus. T – 9, 21, 22
One of the most well-known features of the moon that can be observed with a small telescope is the crater. This particular crater is notable for its system of rays that extend 800 km from its center. It is 3.75 km deep and has a diameter of 93 km. When the Sun rises or sets over the crater, it creates stunning visual imagery for observers.
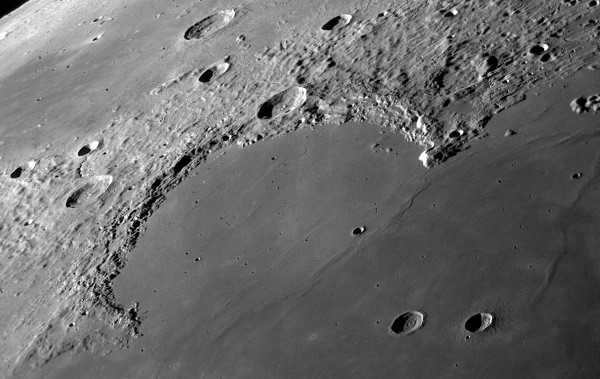
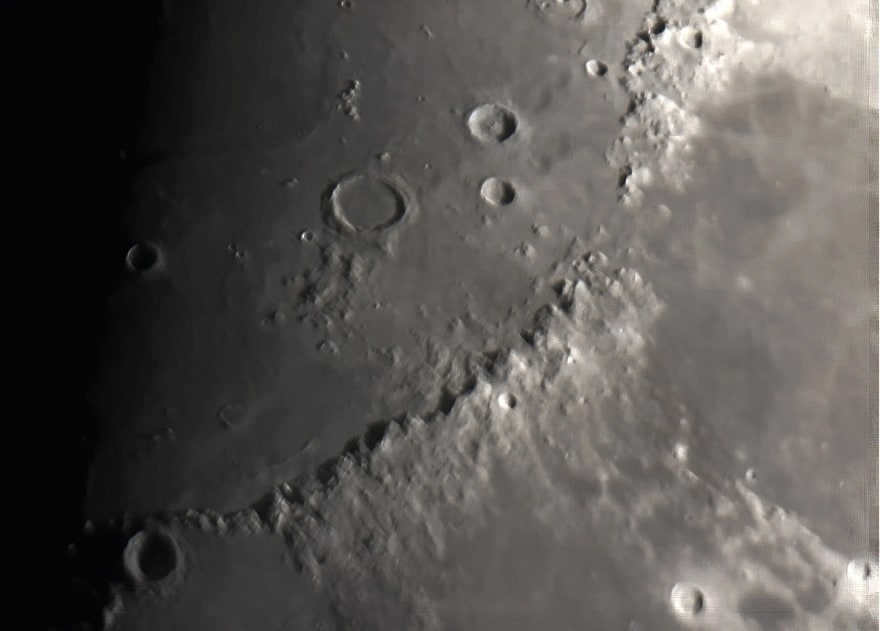
The Straight Wall, also known as Rupes Recta, is another interesting lunar feature to study. It can be observed with telescopes of magnification T – 8, 21, or 22.
The image above displays a geological fault known as the Straight Wall (Rupes Recta), which can be easily observed using a 60 mm telescope. This fascinating feature spans a length of 120 kilometers and is situated at the base of an ancient, decaying crater. You can also spot remnants of this crater at the eastern edge of the Straight Wall.
Rümker Hills (Rümker Hills) T – 12, 26, 27, 28
The Rümker Hills, also known as Rümker Hills, is a massive volcanic dome that can be easily observed using a 60-millimeter telescope or powerful astronomical binoculars. This impressive hill has a diameter of 70 km and rises 1.1 km above the lunar surface.
Another notable feature of the moon is the Apennines mountain range. It can be found in the T – 7, 21, 22 regions.
The Apennines is a mountain range stretching 604 kilometers long. Although visible with binoculars, a telescope is needed for more detailed observations. The range features peaks reaching heights of up to 5 kilometers, and certain sections are marked by deep furrows.
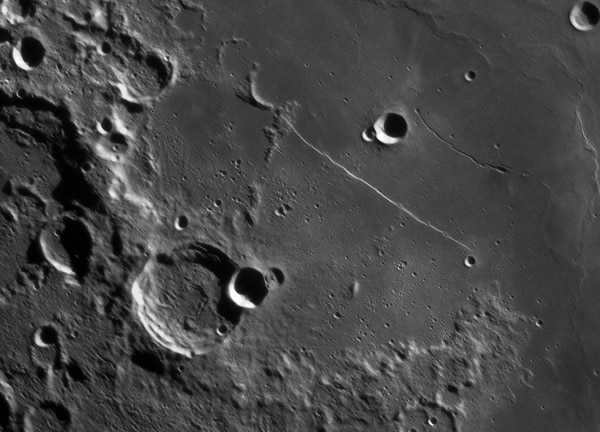
Plato Crater Т – 8, 21, 22

When observed through binoculars, Plato Crater is a favorite among amateur astronomers. This crater has a diameter of 104 kilometers. Jan Hevelius, a Polish astronomer from the 17th century, gave it the poetic name “Big Black Lake.” When visualized with a beginner telescope or binoculars, it appears as a large dark spot that stands out against the bright surface of the Moon.
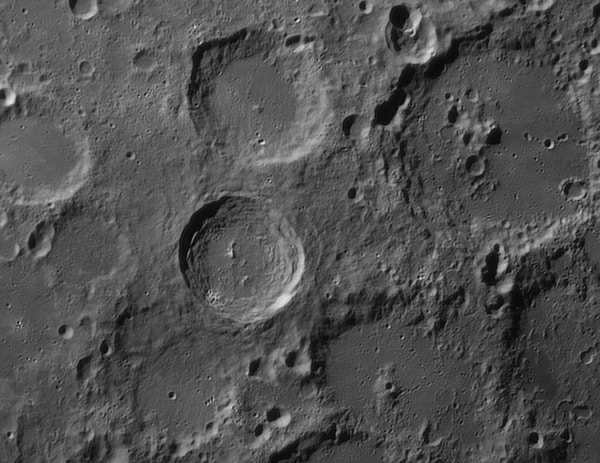
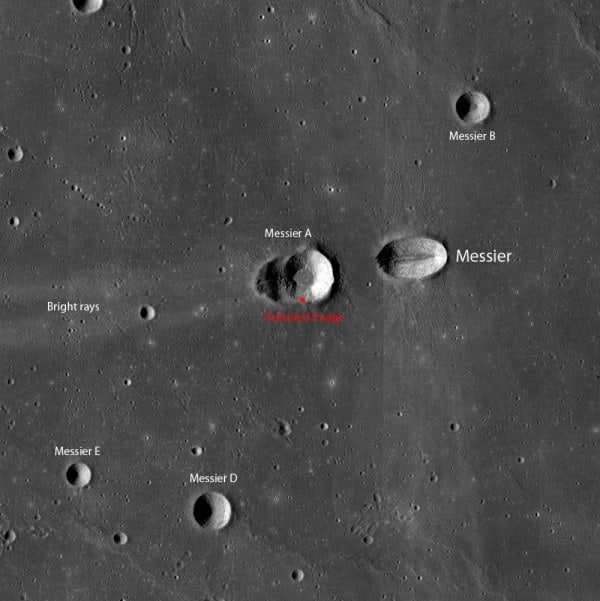
Messier and Messier A (Messier and Messier A) Т – 4, 15, 16, 17
A pair of small craters that can be observed with a telescope starting from 100mm. Messier is an elongated object with dimensions of 11 by 9 kilometers. Messier A is slightly larger, measuring 13 by 11 km. To the west, there is a pair of light rays that extend over 60 km.
Petavius crater (Petavius) T – 2, 15, 16, 17
The Petavius crater, also known as Petavius, can be seen with small binoculars, but it truly becomes a mesmerizing sight when observed through a powerful telescope with high magnification. The crater’s floor is characterized by a dome-like shape and is adorned with intricate cracks and grooves.
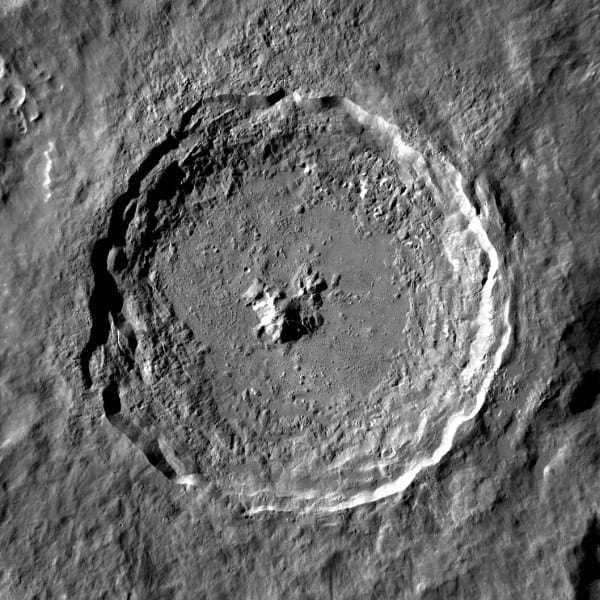
Crater Tusho (Tycho) T – 9, 21, 22
One of the most renowned lunar features, it gained fame for its extensive network of rays surrounding the crater. Spanning a distance of 1500 km, these rays are visible even with basic binoculars.
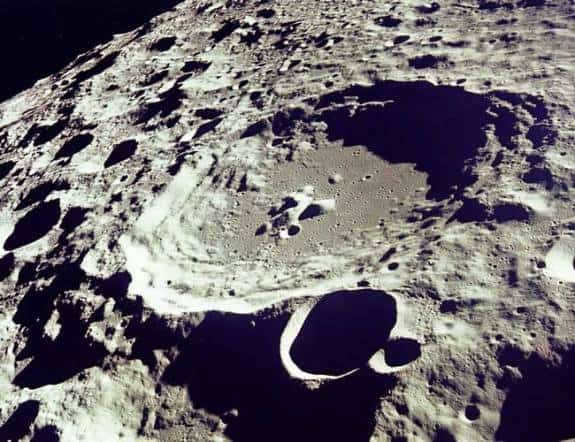
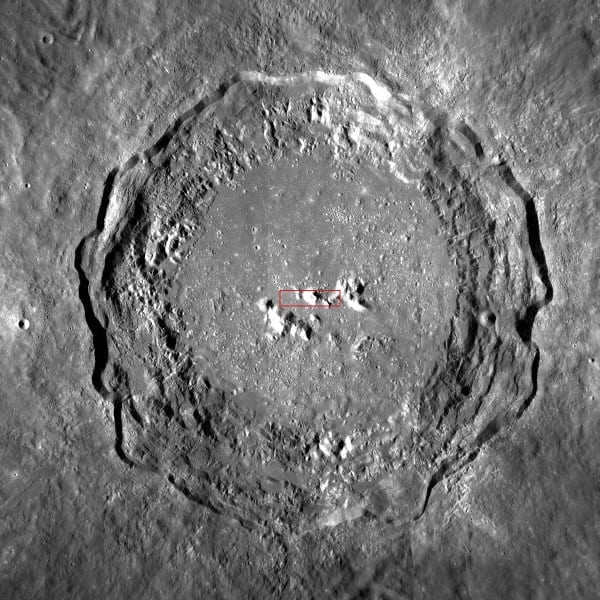
Gassendi Crater. T – 10, 23, 24, 25
Crater Gassendi. T – 10, 23, 24, 25
Crater Gassendi, an oblong-shaped formation spanning 110 kilometers, is a magnificent spectacle that can be easily observed through binoculars with a 10x magnification. However, it is with the aid of a telescope that one can truly appreciate the intricate details within this crater. The telescope reveals a vast expanse of crevasses, hills, and mountains, all nestled at the bottom of the crater. Additionally, one cannot miss the partially collapsed walls that enclose this remarkable geological marvel. Situated at the northern edge of the crater, the presence of Gassendi crater gives the impression of a sparkling diamond ring.
Author’s Note
If your sky is currently cloudy or if you don’t have any astronomical equipment, don’t worry! Our website has a solution for you. We are proud to introduce an interactive 3D moon model and a real-time moon observation service. Now you can explore the moon without leaving your home!
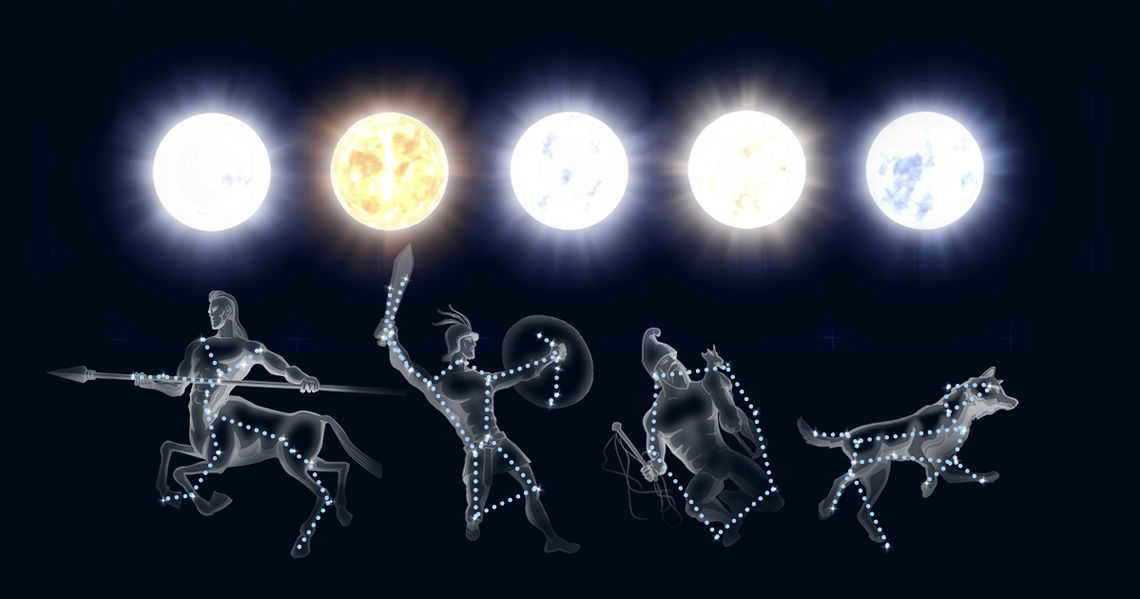
- Methods for Sun observation
- How to observe the Moon;
- 100 features on the Moon’s surface
- Observation techniques for Mercury and Venus;
- A guide to observing Mars;
- Observing Jupiter: tips and tricks;
- Observing Saturn: a beginner’s guide;
- How to observe Uranus, Neptune, and Pluto
- Solar Eclipse: a comprehensive guide;
- Lunar Eclipse: observation techniques
- How to observe dark nebulae;
- A guide to observing globular clusters
- Exploring double stars: fundamental concepts
- Polar Lights: observation and photography;
- Silver clouds: discovery, observations, and properties
The Moon, being the nearest celestial object to us, is a prime target for exploration and serves as an ideal location for various scientific endeavors. One such purpose is the establishment of lunar bases and scientific facilities, including astrophysical observatories.
Pioneering Lunar Telescope
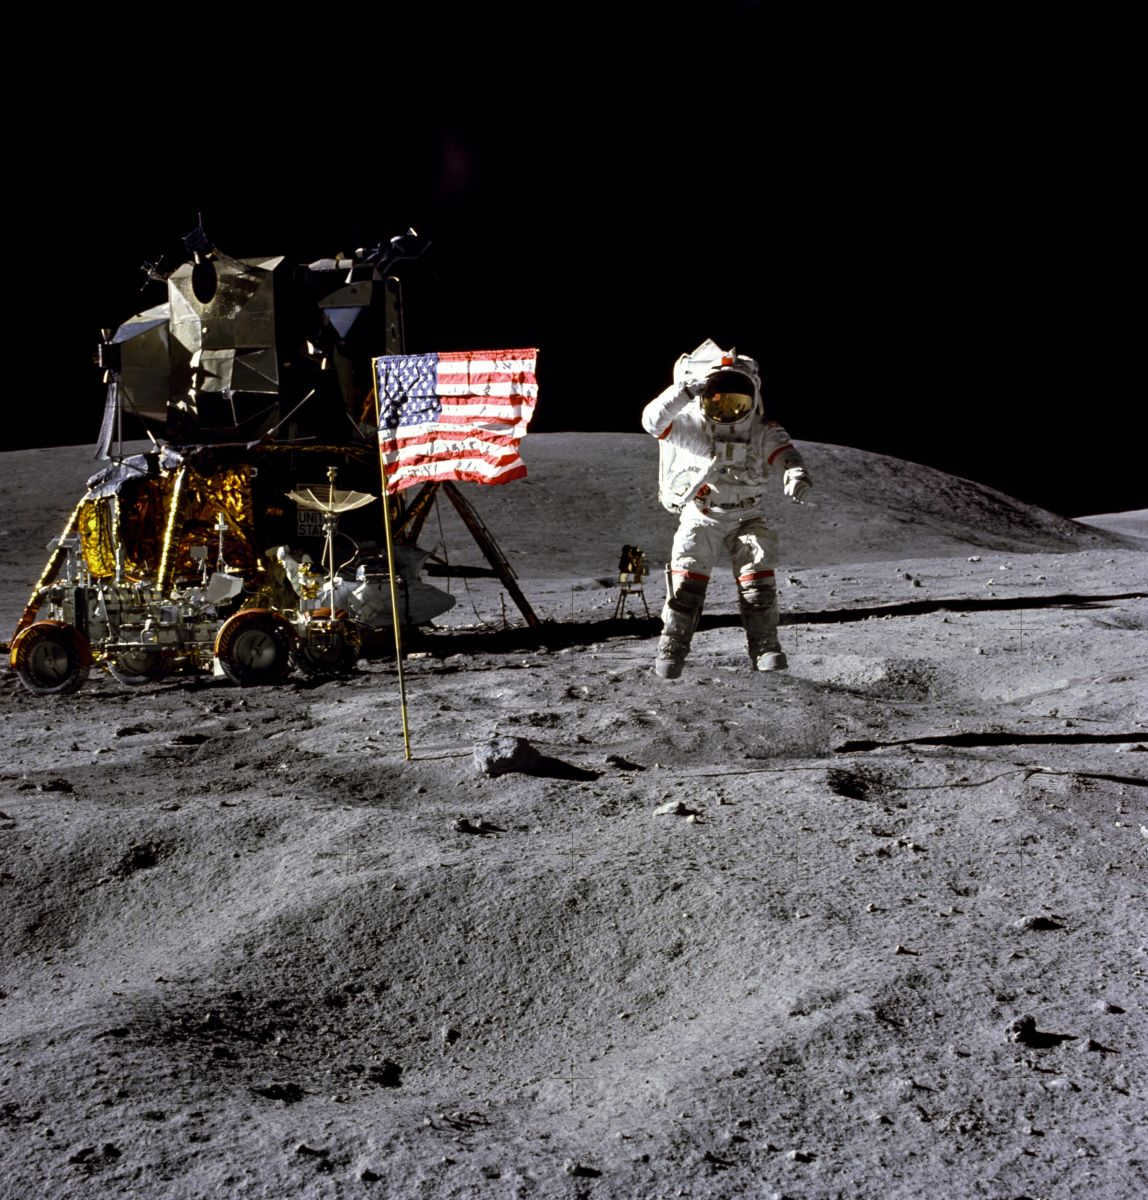
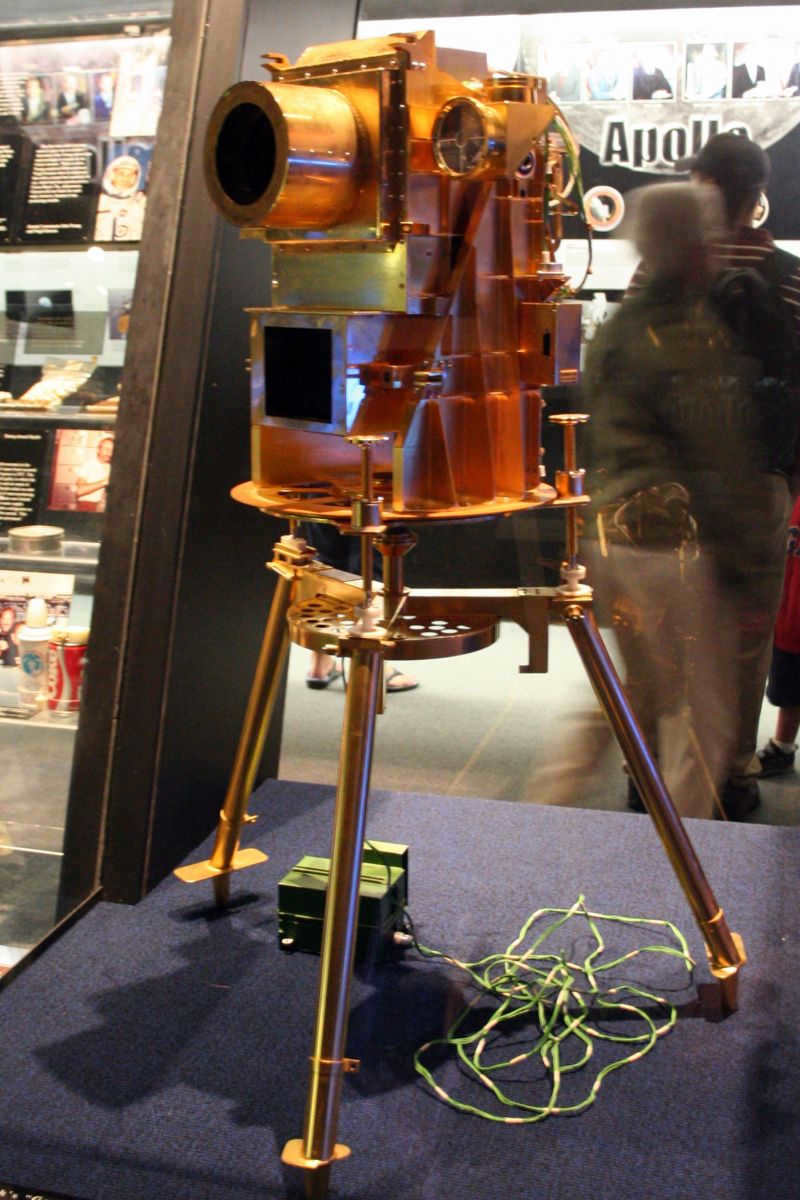
Once humans had the opportunity to reach the Moon, a telescope was promptly transported there. The initial telescope sent was a relatively small UVC (Far Ultraviolet Camera/Spectrograph). It arrived on the lunar surface in April 1972 during the Apollo 16 mission, which was the fifth manned mission to land on the Moon. Weighing 22 kilograms, this instrument included both a telescope and a camera, and it was specifically designed for space exploration in the far ultraviolet range. Out of the entire ultraviolet spectrum (ranging from 10 to 400 nm), this telescope only captured electromagnetic radiation with wavelengths between 50 to 160 nm.
It is well known that the Earth’s atmosphere absorbs almost all radiation in the far-ultraviolet range and about 90% in the mid-ultraviolet range. This means that astronomers only gained access to the short-wavelength part of the spectrum with the advent of space flights. It was therefore a justified idea to bring along a telescope capable of detecting far-ultraviolet radiation – since the Moon lacks an atmosphere.
The Benefits of the Moon for Infrared Observatories
The Moon also presents unique opportunities for infrared telescopes. While the Earth’s atmosphere allows infrared radiation to pass through, it can also introduce interference due to thermal noise created by the electronic circuits of telescopes. To mitigate this, the equipment of these telescopes needs to be continuously cooled.
One notable infrared space observatory is the Herschel orbiting telescope, which completed its scientific mission in June 2013 and now orbits the Sun indefinitely. The four-year mission came to an end because the spacecraft ran out of liquid helium, which was used to cool the infrared CCD array. By evaporating, the helium maintained the telescope’s chambers at a temperature of -271 °C.
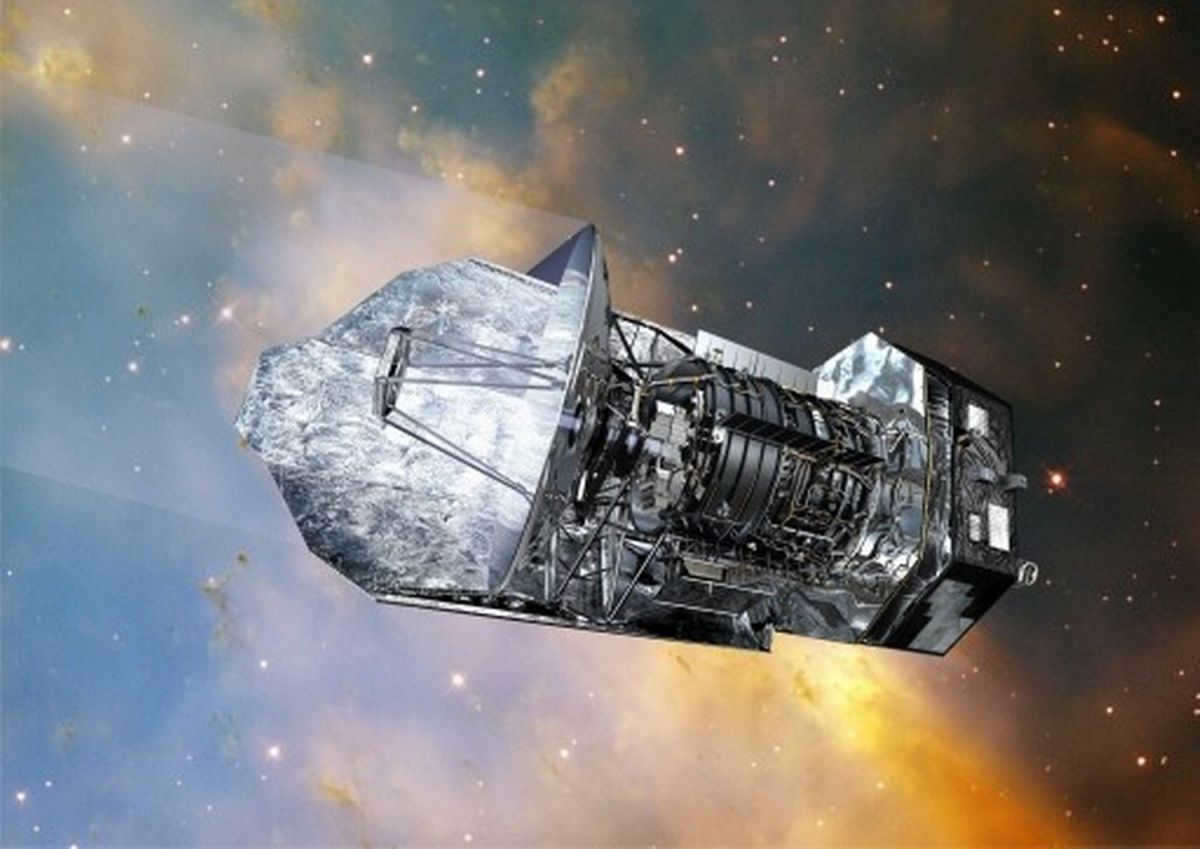
The Herschel Orbiting Telescope
James D. Burke from the Jet Propulsion Laboratory in Pasadena, California, USA, has come up with an innovative idea to construct an observatory outside of Earth that will have a longer lifespan. He proposes utilizing the natural features of the Moon, specifically certain craters located in its polar regions that are constantly in shadow. These craters maintain a consistent temperature, with an average of -200 °C. By placing an infrared observatory within one of these shaded lunar craters, there would be no need for refrigeration or cryogenic facilities, which would otherwise need to be transported from Earth.
Telescope Featuring a Lunar Dust Mirror
The optical spectrum encompasses electromagnetic wavelengths ranging from approximately 1 nm to 1 mm, which includes the visible range perceivable by the human eye (380 to 780 nm). Astronomical observatories situated on the lunar surface possess a significant advantage over their terrestrial counterparts. They not only facilitate enhanced visibility, but also yield superior imagery. The absence of an atmosphere on the Moon eliminates atmospheric distortions, which necessitate the construction of telescopes at great heights on Earth. Consequently, the resulting images of observed celestial objects exhibit heightened quality.
Moreover, the Moon possesses an extremely slow angular velocity when it comes to rotating in the sky. This makes it easier to track and capture the desired object using a longer exposure time. Consequently, this method proves effective in observing faint objects that emit minimal light. Among these objects are distant stars and exoplanets, which rely on reflected light from their parent stars to “shine.” These observations enable us to analyze the spectrum of such planets and gain insight into the composition of their surrounding atmospheres. Ultimately, this knowledge propels us forward in our quest to discover habitable planets orbiting other stars.
Given these circumstances, researchers are confronted with several pertinent questions, including: how can we transport such a telescope to the Moon? Will it resemble terrestrial observatories? And how can we optimize the capabilities of our satellite to their fullest potential?
The proposed lunar telescope by Chen will have a mirror diameter of 50 meters, which is significantly larger than the largest segmented mirror of a terrestrial telescope, measuring only 10.4 meters (Grand Canary Telescope, Spain). The Large Binocular Telescope in Arizona, USA, houses the largest monolithic mirrors, each with a diameter of 8.4 meters.
Therefore, for the lunar telescope, only a small amount of epoxy resin, carbon nanotubes, and aluminum for mirror coating will need to be transported to the Moon. These materials will be mixed with lunar dust and solidified to create a strong blank, similar in strength to concrete.
Peter Chen and his colleagues showcased their innovation at the American Astronomical Society conference in St. Louis. They presented a live demonstration, where they combined a small quantity of carbon nanotubes and epoxy resin with stone crumbs that closely resembled lunar regolith in terms of particle size and composition. The outcome of this experiment was a 12-inch long blank with a parabolic shape. This composite material has the potential to serve as a superior alternative to glass in mirror production. The only remaining step is to apply a thin layer of aluminum coating onto the blank.
Scientists believe that the telescope’s resolution will be so advanced that it will enable the detection of ozone and methane traces in the spectrum of exoplanets, which are considered as indicators of life. However, while the creation of the mirror blank seems to be straightforward, the authors of the invention have not yet disclosed how they plan to achieve the ultra-precise processing of the telescope’s working surface.
Telescope with an Enormous Liquid Mirror
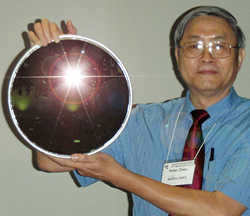
One possible solution to the aforementioned inquiries involves the concept of installing a telescope with a liquid mirror on the lunar surface. Roger Angel, a professor at the University of Arizona, has taken on the task of investigating the feasibility of constructing such a telescope. NASA has provided funding for his research, resulting in the creation of the Lunar Liquid Mirror Telescope (LLMT). This innovative telescope consists of a wide rotating “saucer” containing a special liquid that acts as the mirror. As the saucer rotates, the liquid surface forms a concave parabolic shape, serving as the mirror for the telescope.
The Moon’s low gravity offers the advantage of constructing a telescope with an enormous mirror measuring 100 meters in diameter. Similar to other planned lunar installations, the LLMT is intended to be situated at the Moon’s south pole.
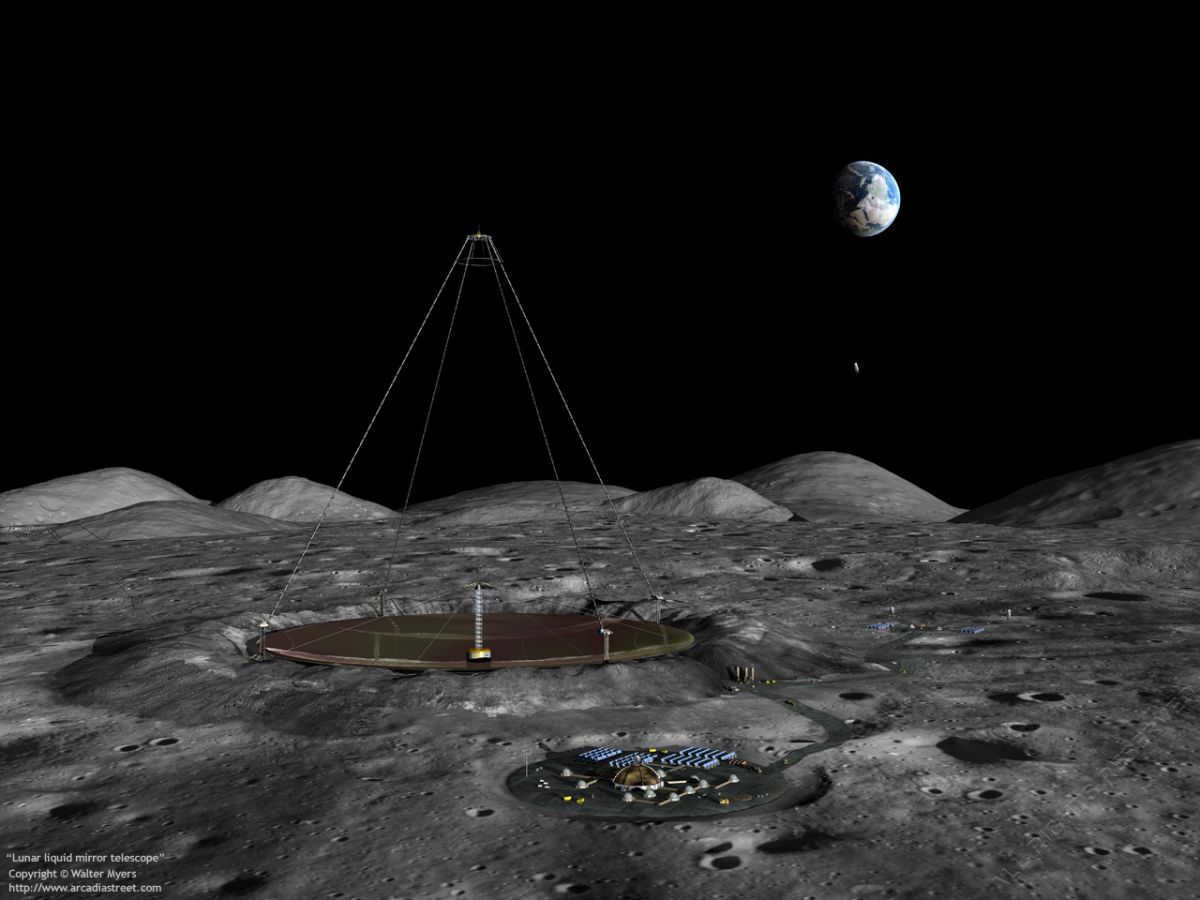
Telescope Utilizing a Liquid Mirror
An intriguing fact is that a comparable telescope has already been constructed right here on our own planet. Known as the Large Zenith Telescope, it boasts a 6-meter liquid mirror and is situated in British Columbia. Instead of liquid mercury, it employs a different substance as its mirror liquid. However, due to the extremely low temperatures on the Moon, this particular material cannot be used as it freezes at -38°C. Consequently, scientists are currently on the lookout for a new and suitable “filler” for lunar telescopes.
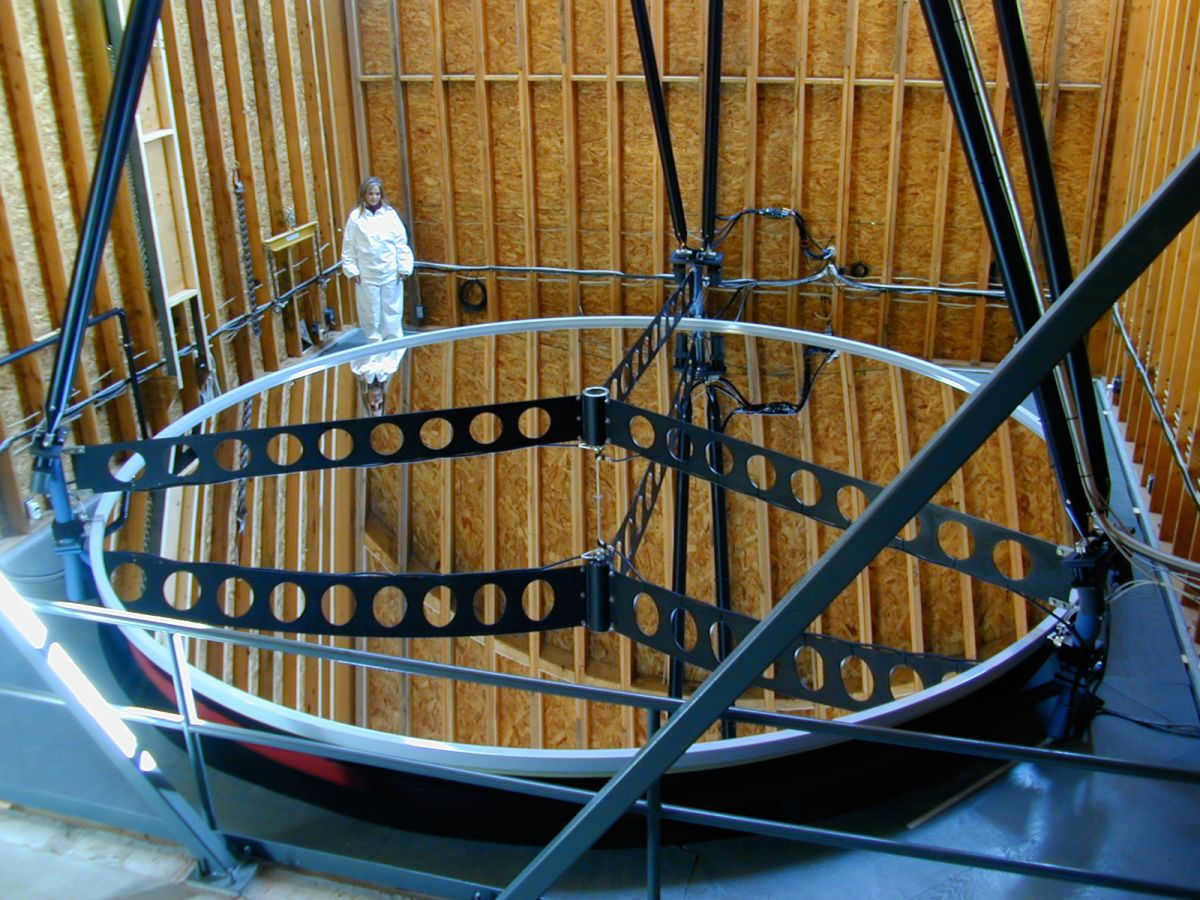
The Great Zenith Telescope
However, there is one drawback to telescopes equipped with a liquid mirror that is challenging to address, even on the Moon. The mirror cannot be adjusted to point towards a specific object of interest. If the mirror deviates from its horizontal position, the force of gravity will cause it to distort, rendering it unsuitable for astronomical observations. Consequently, these telescopes are designed to look directly upwards, towards the zenith. It is no wonder that they are referred to as zenith telescopes.
Nevertheless, this drawback cannot be deemed substantial. To start with, our celestial companion revolves on its axis, thereby enabling a zenith telescope to capture various sections of the heavens. Moreover, when considering the observation of ancient and far-reaching entities, this constraint loses its significance – at immense distances, our cosmos exhibits uniformity, irrespective of the vantage point. Additionally, Roger Angel intends to study archaic stars and galaxies, encompassing the very inaugural stars of our Universe.
Optical telescope on the southern pole of the Moon
The southern pole of our natural satellite, also known as the lunar “Antarctica,” has become a focal point of interest for national space agencies and private citizens venturing into space. It is frequently included in plans for lunar exploration, serving as a potential location for lunar bases and research station landings.
Due to the minimal inclination of the lunar axis and the unique topography of this polar region, there are areas within 50 kilometers of the pole that experience “eternal” day and night. These areas include craters that are rarely exposed to sunlight and mountain peaks that are almost always illuminated. In contrast, the North Pole has a greater abundance of such locations compared to the South Pole.
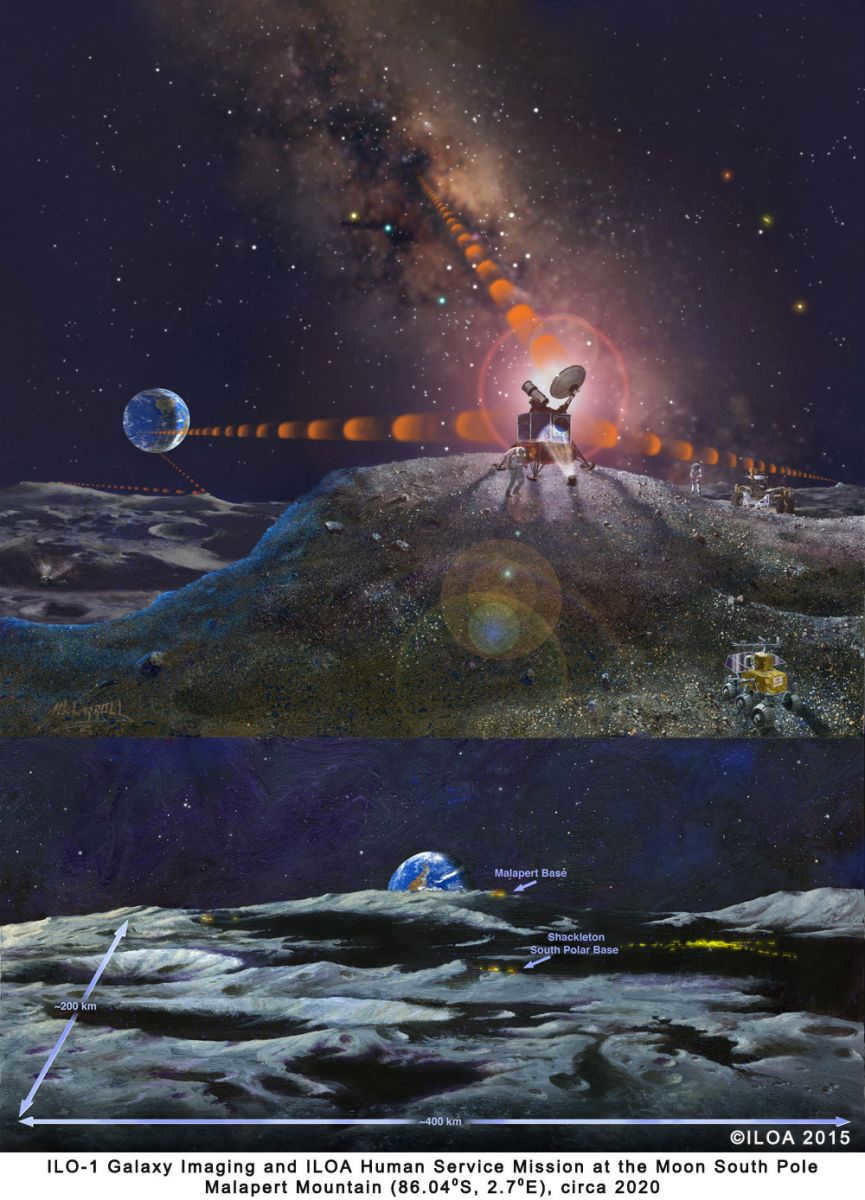
Standing out amidst the peaks of the South Pole is the notable Malapert Mountain. This elevation, reaching approximately 5000 meters in height, is located in the southwestern section of the rampart of the ancient, yet heavily damaged, Malapert crater. Throughout the lunar year, the mountain’s summit experiences an average illumination of 74%. While this may not be an extensive amount, the mountain resides on the visible side of the Moon, allowing for constant accessibility in terms of radio communication. As a result, there is no need to launch orbital repeaters around the Moon in order to maintain contact with the telescope, along with other scientific apparatus and even the inhabited base, situated on the mountain. Furthermore, the fact that the mountain is consistently bathed in sunlight maximizes the utilization of solar panels, which serve as the primary energy source for the observatory’s instruments.
This particular site has been selected by the private enterprise known as Moon Express and the non-profit organization called the International Lunar Observatory Association. They have chosen the Malapert crater as the location for their small optical telescope, which will also include a two-meter radio antenna and solar panels. The estimated cost for this ambitious project is around 100 million dollars. The hope is that both private investors and government space agencies will contribute to the funding. It was originally planned for the project to be completed by 2018.
Discovery of potentially habitable planets will be facilitated by an ultra-long-wave telescope
Humanity initiated the exploration of the cosmos by employing telescopes that could observe the visible range. Nowadays, numerous telescopes have been constructed to cover almost all segments of the electromagnetic spectrum. However, there is one range that remains unexplored – the ultra-long-wave range. Due to the reflection of ultra-long waves by the ionosphere, they are unable to reach the Earth’s surface. Therefore, in order to observe this range, a telescope must be positioned outside of our planet. Nevertheless, placing receiving antennas in orbit is not a viable solution as the Earth emits its own ultra-longwave radio emissions, both natural and anthropogenic. The only way to shield from these emissions is to position the telescope in the radio shadow of the Moon. Consequently, the telescope should be situated on either the far side of the Moon or within one of the craters at its pole. However, in order to maintain radio communication with the lunar observatory on the far side of the Moon, a satellite repeater will be necessary, making the project even more costly. On the other hand, if the radio observatory is located within the bowl of the crater at the pole, the repeater can be installed on its rim, ensuring constant visibility of our planet. Furthermore, the telescope itself for this range of frequencies is relatively uncomplicated. Despite its large size, the antenna systems will consist of wires that are spread across the surface. These wires will be transported to the Moon in coils and then deployed on site.
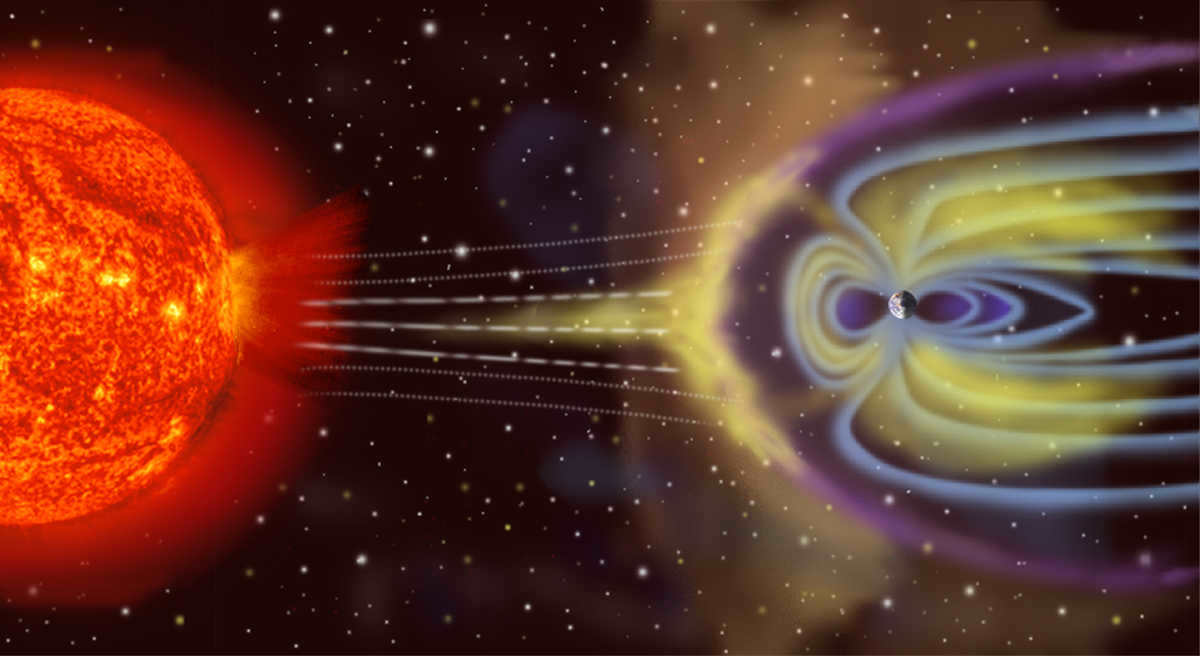
Earth’s magnetosphere
Russian scientists have frequently proposed the concept of an ultra-long-wavelength telescope. Andrei Sadovsky, the Head of the Scientific and Educational Center at the Space Research Institute of the Russian Academy of Sciences and a Candidate of Physical and Mathematical Sciences, presented one such project. The implementation of this project will involve several phases. Initially, an antenna will be installed on the Moon to test its functionality, determine the signals it can receive, and assess radio interference on the lunar surface. In the future, the project is expected to expand, eventually incorporating a hundred clusters, each consisting of ten antennas. Even during the initial phase, the antenna will be capable of detecting radio bursts emitted by the Sun.
However, the primary objective of this particular radio telescope is to explore the possibility of habitable planets. While other lunar observatories may focus on detecting signs of life in the atmospheres of planets beyond our solar system, this one specifically aims to locate exoplanets that possess a magnetosphere. These types of planets are considered potentially habitable. The fact that Earth has a magnetosphere and supports life serves as evidence for this possibility. In contrast, Mars lacks a magnetosphere and is a barren wasteland. The Earth’s magnetic field plays a critical role in shielding the planet from high-energy solar radiation and preventing the loss of its atmosphere and water.
By means of the auroral kilometer radio emission, it is feasible to ascertain the existence and magnitude of the magnetic field. This specific electromagnetic radiation falls within the ultra-long-wave spectrum and possesses a comparatively low frequency. It originates from the interaction between the planet’s magnetosphere and the stellar wind flow that reaches it.

One of the primary objectives of this telescope is to investigate the epoch of secondary ionization. This will enable the creation of a three-dimensional map of the universe based on neutral hydrogen readings.
According to scientists, the construction of this radio telescope will be significantly cheaper than the Russian space observatory “Radioastron”. However, the realization of this project is only possible within the scope of manned lunar missions.
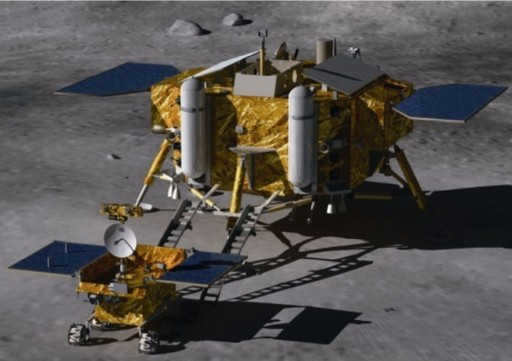
China’s Lunar Ultraviolet Telescope (LUT) has successfully made its way to the Moon
While the initial telescope transported to the Moon required manual guidance from astronauts, China’s LUT has already made its mark on the lunar surface. This groundbreaking achievement marks the first remotely operated telescope on the Moon that can be controlled from Earth. The LUT, a lunar-based ultraviolet telescope, is equipped with a 150-millimeter reflector telescope using the Ritchie-Cretien system. This impressive instrument was delivered to the Moon in December 2013 by China’s Chang’e-3, an automatic interplanetary station. The Ritchie-Cretien system is widely utilized in various scientific instruments, including NASA’s renowned Hubble orbiting telescope.
The Moon completes its orbit around our planet in 27 days, allowing for continuous observation of the same object for a period of ten days. Chinese scientists have capitalized on this by utilizing a lunar observatory, which has resulted in several intriguing findings. During their observation of the enigmatic double star, also known as V921, Chinese astronomers have made the groundbreaking discovery of a previously unidentified third component – a dim star with an orbital period of 10.2 years. The existence of this star has proven to be pivotal in the development and progression of the V921 system.
In the coming decades, we can expect to see the establishment of the first lunar observatories. By constructing telescopes on the surface of the Moon, we will gain a deeper understanding of the cosmos and uncover previously unknown celestial bodies, some of which may be suitable for sustaining life. The study of lunar astronomy presents a compelling incentive for embarking on future lunar exploration missions, with the ultimate goal of establishing a permanent human presence on our satellite.
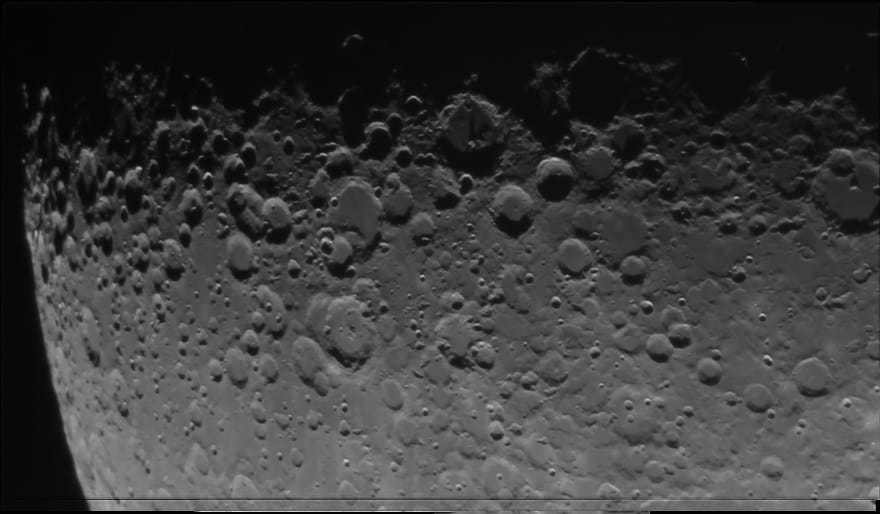
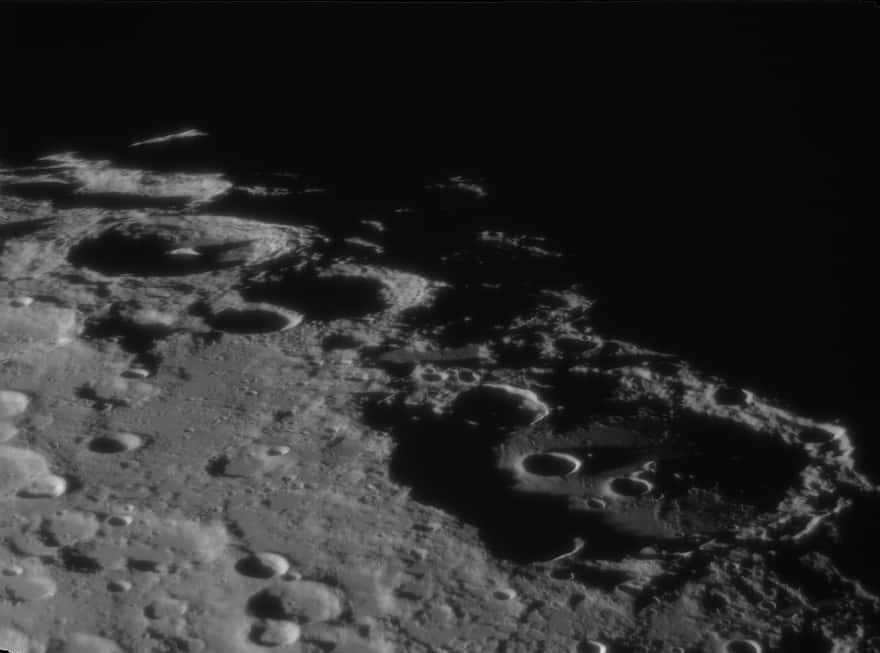
Studying the Moon is one of the easiest tasks for amateur astronomers. In fact, most astronomers live in cities where the brightness of streetlights can obstruct observations of galaxies and nebulae. However, the Moon is a large and luminous celestial object, displaying numerous craters, mountains, and other features that can be observed even with binoculars or a low-cost telescope.
Observing the Moon may initially seem straightforward – just point your binoculars or telescope at it. And for the most part, it is. However, you may quickly notice that the visibility of lunar details can vary.
Lunar Cartography
Moon libration – the Moon’s oscillation
During long-term observations of the Moon, a careful amateur astronomer may observe a back and forth oscillation of the Moon within an hourly direction. Additionally, objects may appear or disappear at the edges of the lunar disk.
This phenomenon is known as “libration of the Moon” – it involves intricate oscillatory movements, although they are not very large and occur over the span of a month. The Moon appears to sway from side to side, allowing us a glimpse of the Moon’s back side beyond its visible horizon ;-).
This is also advantageous because during the extremes of the lunar oscillations, we are able to gain a more detailed view of objects situated near the edges of the lunar disk.
Strategies for Enhancing Your Moon Observations
Observing the Moon during a full moon is not ideal due to the absence of visible shadows, resulting in a “flat” appearance. For a more detailed view of specific craters or mountain ranges, it is recommended to observe when the lunar terminator intersects the desired area. The lunar terminator is the moving boundary between light and shadow on the lunar surface, dictated by the changing lunar phases. While it may be helpful to observe the target a day before or after the terminator passes, it is worth noting that the terminator moves relatively quickly. Consequently, even a few hours of continuous observation can reveal noticeable changes in the lunar landscape.
If you want to have a more detailed view of something, the most effective way is to approach the object. However, how can you approach the Moon? It appears that it is possible, you simply need to select the right observation time! 😉
The reality is that the Moon travels around the Earth in an elliptical path. This means that the distance between the Earth’s center and the Moon varies from 356,410 to 406,720 km. In other words, the difference is approximately 50,000 km! Stated differently, the angular size of the Moon’s disk continually changes from 33' 30" to 29' 22". That’s about 11-12%. It may not be much, but it is quite noticeable and it would be a missed opportunity not to take advantage of it.
Therefore, by identifying the next lunar perigee (the closest distance from the Earth to the Moon) according to astronomical calendars, you can attempt to observe the lunar surface details that you want to examine more closely.
Select a time when the Moon reaches its highest point above the horizon during the nighttime. During this time, there is less dense layer of the Earth’s atmosphere between you and the Moon, causing less distortion in the image. The shaking caused by the atmosphere is particularly bothersome when the Moon is close to the horizon.
Many people agree that there are two particularly favorable periods for observing the Moon during the lunar month (from New Moon to New Moon). These periods are determined by both the length of shadows on the lunar surface and the time of observation.
The first period is from the New Moon to two days after the end of the First Quarter. During this time, the Moon is visible in the evening, which is quite convenient, although the evening atmosphere is often turbulent.
The second period starts two days before the beginning of the Last Quarter and continues until the New Moon. This phase of the Moon occurs in the morning hours, when the atmosphere is relatively calm and has had time to cool down and clear overnight.
A filter for lunar observation
There are filters available in different levels of darkness. It is more practical to have multiple filters and swap them based on the phase of the moon. When I first started observing, I purchased a filter that allows around 18% of light to pass through (priced at approximately 300 rubles) – it served me well for a telescope with a 250mm aperture.
It appears that there are lunar filters on the market that offer adjustable levels of dimming. This would be convenient for use with telescopes of varying apertures. Additionally, the brightness of the moon changes as its phase changes. I haven’t had the opportunity to test these filters yet, so I can’t provide any feedback on them.
Lunar observation telescope
This chart provides the maximum theoretical level of magnification. Considering the adjustment for equipment quality, it is advisable to decrease it by approximately 15-20%.
While I won’t delve into specifics, the sight of the Moon through a large mirror reflector is absolutely captivating. This is true even though my Levenhuk 250 Ra is not primarily intended for planetary observation, but rather for observing Deep Space objects like galaxies and nebulae. (I must reiterate – this is not a refracting telescope, but a reflecting one).
What can I say? It simply confirms the principle that “aperture rules”. 🙂
Furthermore, I find color halos (chromatism) to be bothersome in inexpensive refracting telescopes, but they do not exist in reflecting telescopes. However, refracting telescopes have superior clarity.
Lastly, I want to discuss the act of observing the Moon using binoculars. Numerous individuals possess binoculars, so there is scarcely anything novel to mention here – it is difficult to locate a binocular proprietor who has not directed them towards the Moon on at least one occasion. The magnification of regular binoculars is modest, typically around 8-12 times, rendering it impossible to discern imperfections in the image.
However, if you are on the verge of purchasing binoculars, there are valuable insights to keep in mind when selecting binoculars for astronomical observations.

There’s no need to disrupt your daily routine and remain awake throughout the night in order to appreciate the splendor of the heavens. This informative article will acquaint you with the various celestial entities that are visible in the sky during daylight hours.
What celestial bodies are visible in the sky during daylight hours?
Daytime In the realm of astronomy, daylight hours encompass the period from when the upper edge of the Sun becomes visible above the horizon until the Sun is fully below the horizon. While the brightness of sunlight typically obscures many celestial objects, there are still some that can be observed, including the Moon, planets, the most brilliant stars, and even the Sun itself. This article provides a list of the most prominent objects to look for during daylight hours.
What sets daytime astronomy apart?
While nighttime astronomy is more widely known and practiced, daytime astronomy offers its own unique advantages. During daylight hours, you have the opportunity to observe the Sun and witness extraordinary astronomical phenomena like solar eclipses or celestial bodies aligning with the Sun. Furthermore, you can also observe traditional “nighttime” objects at a more convenient and comfortable time.
Caution: Do not observe the Sun without proper protection! Observing the Sun without proper protection is highly risky, even with the naked eye. If you attempt to view it through binoculars or a telescope, you risk severe damage to your retina, which could lead to permanent blindness. Furthermore, directing a lens towards the Sun without a suitable filter can result in irreparable harm to your telescope or camera. Thankfully, these dangers can be mitigated by using a specialized solar filter or by employing indirect observation techniques – we will discuss safe methods for observing the Sun in more detail later on.
What is the ideal time to begin astronomical observations?
The optimal time to start observing astronomical objects during the day is at the transitional period between daylight and darkness. To witness a greater number of celestial phenomena, it is recommended to commence observations at the moment when the first rays of the Sun appear on the horizon or just before the conclusion of sunset. Additionally, we have created an informative infographic that provides insights into the three distinct stages of twilight, allowing you to appreciate the beauty of each one.
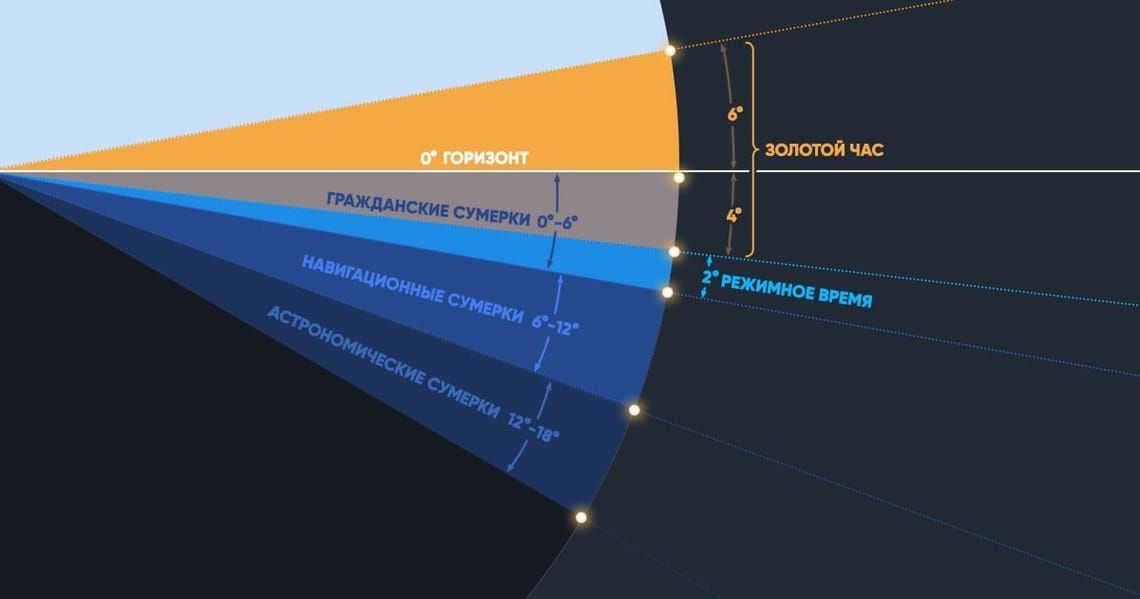
What time does twilight occur? What are the different types of twilight? What is the golden hour? Our infographic provides answers to these inquiries and more.
What are the benefits of daytime astronomy?
Daytime offers a fantastic opportunity to introduce children to astronomy as they don’t have to go to bed early, and it’s much warmer outside. Additionally, setting up the telescope is more convenient during the day as you don’t have to navigate in the dark or use a flashlight. Moreover, if you become tired of observing the sky, you can use the telescope and binoculars to observe nature during the day.
Tools for Observation
During the daytime, the sky is dominated by the Sun. Therefore, it is advisable to have binoculars or a small telescope in order to observe celestial objects in sunlight. However, it is important to remember to use solar filters to protect your eyes and your equipment. Additionally, it is not possible to use constellations as a point of reference when searching for celestial objects during the day. Thankfully, there is a useful tool called Sky Tonight, a free astronomy app that can assist you in determining the location of celestial objects above you and provide information on upcoming astronomical events that you can observe.

Discover how to locate the most brilliant stars, such as Sirius, Arcturus, Polaris, and many more. Familiarize yourself with the celestial sphere using this informative graphic!
The moon during daylight hours
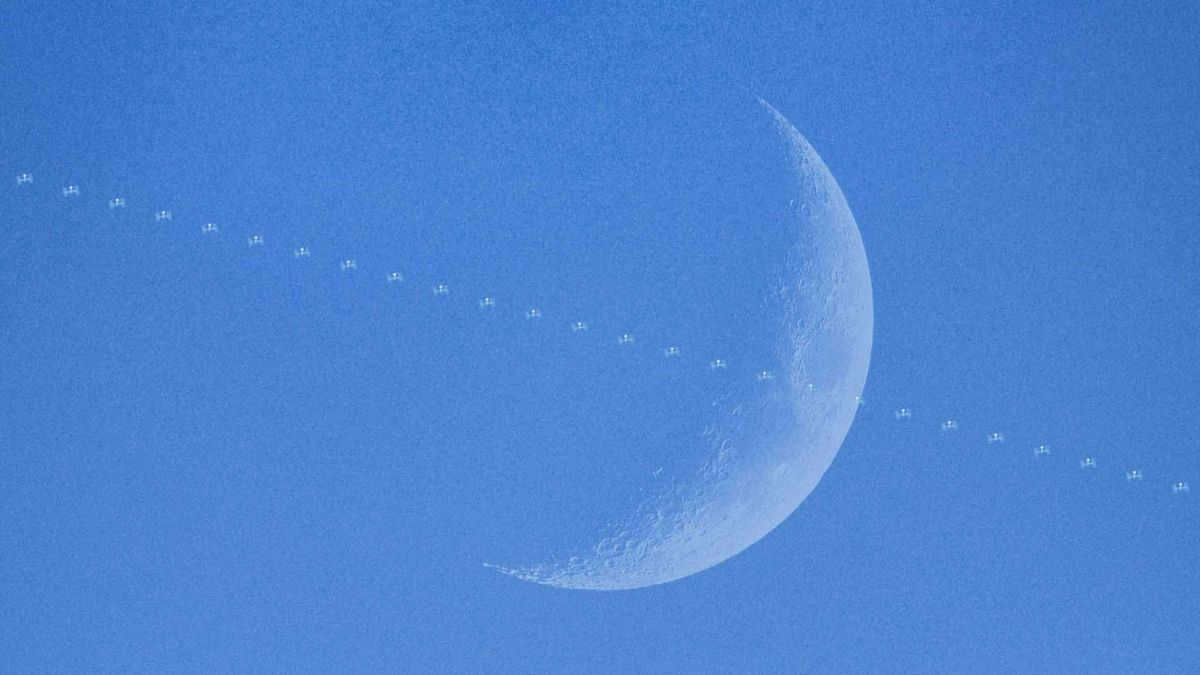
It might appear unusual, but the moon – traditionally associated with nighttime – can be observed in the sky during the day on a regular basis. Granted, it appears less luminous against a blue sky, but it can be easily spotted using telescopes or even with the unaided eye.

Can the Moon be observed during daylight?
There are only two scenarios when the Moon cannot be seen during the day: during a full moon and a new moon. However, during other phases, it is possible to spot the Moon in the sky during daylight if one looks closely. The ideal times to observe the Moon are in the evenings during the first quarter phase and in the mornings during the last quarter phase. During these periods, the Moon remains visible in the daytime sky for longer and is bright enough to not be overshadowed by the sunlight.
To find out the phase of the Moon and its rising and setting times, refer to the Moon tab in the Sky Tonight app calendar.
What causes the Moon to be visible in daylight?
There are a couple of reasons why we can see the Moon during the day. Firstly, the Moon is large enough and close enough to Earth that the scattered daylight doesn’t completely block it from our view. Secondly, the Moon, Sun, and Earth are constantly in motion, constantly changing their positions in relation to each other. When there is a full moon, the Moon sets as the Sun rises, making it invisible during the day. On the other hand, during a new moon, the Moon is in the sky all day, but we can’t see it because the side that is illuminated is facing away from Earth.
Is it possible to observe the planets during daylight?
The planets Venus, Jupiter, and Mars are the most visible during the day, making them the easiest to observe. If the sky is clear and your vision is good enough, you can spot these planets without any visual aids. However, it is important to know where to look. To locate the planets, you can utilize the Sky Tonight app:
- Type the name of the desired planet in the search bar.
- Click on the blue scope icon located next to the planet’s name. This will display its position on the sky map.
- Press the blue compass button or orient your device towards the sky. The image on your screen will adjust to match the actual sky above you. Rotate your device in the direction indicated by the white arrow until you spot the desired planet.
You can also spot Mercury, Saturn, Uranus, and Neptune during daylight hours, but a small telescope is required to view them.
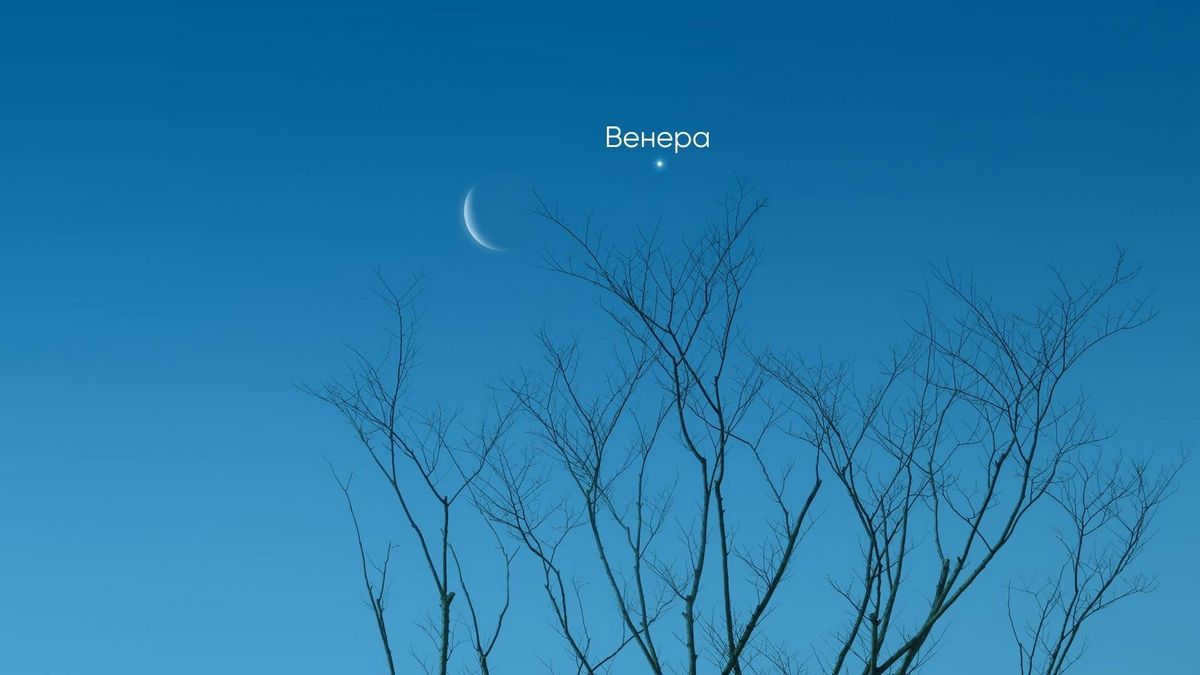
If you’re looking to locate planets, the Moon can serve as a useful guide. Our informative article provides information on the times when the Moon is in close proximity to the planets. Furthermore, certain planets can even be observed during the day when they are near the Sun. However, it is important to take precautions to protect your eyes and telescope from potential damage.
Stars are not visible to the naked eye during the day due to their dimness, but utilizing binoculars or a telescope can assist in observing them. One notable star that can be seen during the day is Sirius, which happens to be the brightest star in the sky besides the Sun. To locate Sirius, you can make use of the Sky Tonight app. Although it is possible to spot Sirius with the naked eye at sunset, the odds are quite low, especially if you don’t have excellent eyesight. However, your chances of glimpsing the stars greatly improve during a solar eclipse, which we will discuss in further detail later on.

Have a glance at this compilation of the most luminous stars in the celestial sphere and marvel at their magnificence using a telescope at any time of the day!
Take a look at this informative image to discover the identities of the most luminous stars and the constellations they belong to, along with their proximity to our planet and the optimal moment for observing them!
Is it possible to spot satellites during daylight hours?
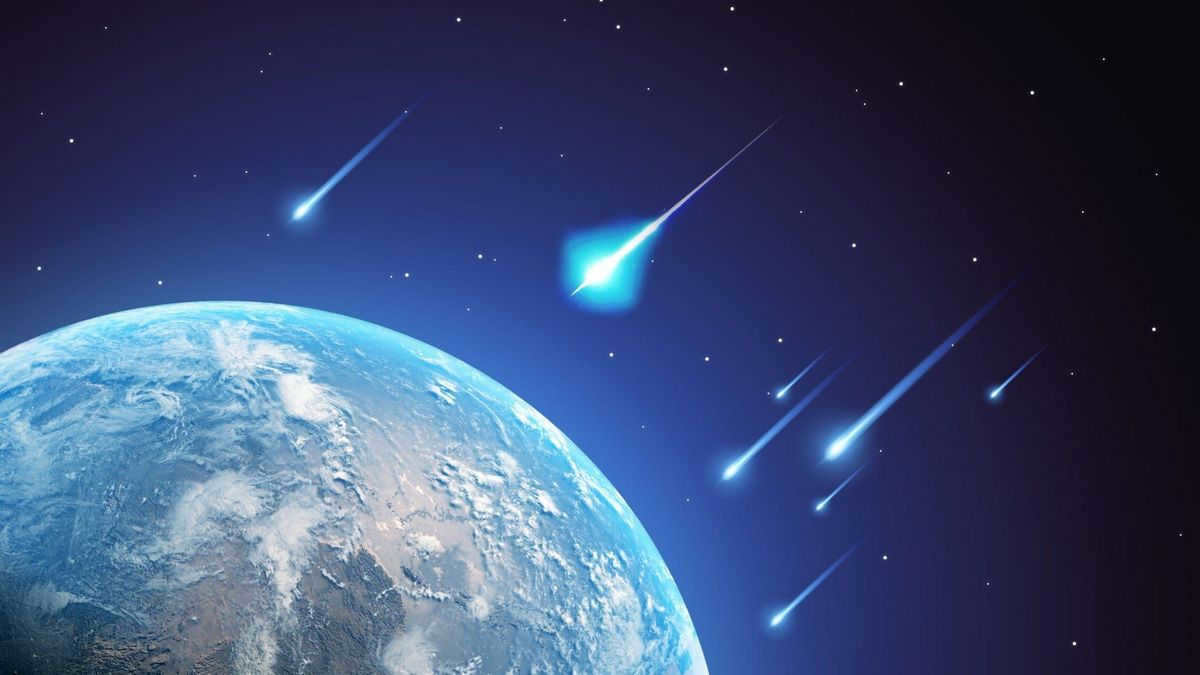
Daily meteor showers
Daily meteor showers are meteor showers that have a radiant point near the Sun. Although most of their meteors are obscured by sunlight, it is still possible to observe some “shooting stars” during twilight, when the Sun is not yet fully visible or when it starts to set. Below are some of the top daytime meteor showers:

- Daytime Capricornids-Sagittarids (January 13-February 4)
- Daytime Arietids (May 14-June 24)
- ζ-Perseids (May 20-July 5)
- β-Taurids (June 5 – July 17)
- Sextantids (September 9-October 9)
Aside from the typical meteors, there are occasional vividly colored bolides. These bolides can have a brightness of -4, making them visible even in daylight. While most celestial objects that create bolides disintegrate in the atmosphere, occasionally fragments called meteorites make it to the surface of the Earth.
Exploring the Sun
The Sun is the most prominent celestial body to study during daylight hours. However, it is crucial to exercise caution when observing it directly, requiring the implementation of safety measures.
How to Safely View the Sun and Protect Your Eyes?
To safeguard your eyesight while observing the Sun, there are a couple of methods you can employ. The first option is to utilize a solar filter specifically designed for telescopes or acquire specialized glasses made for solar eclipses. It’s important to note that regular sunglasses will not provide adequate protection if you directly gaze at the Sun. Additionally, looking at the Sun through a telescope without the appropriate filter can result in eye damage and harm the telescope itself.
The second approach is to opt for indirect viewing or utilize a pinhole projector. This technique is particularly beneficial when observing a partial solar eclipse and doesn’t require any specialized equipment. You can create a projection of the Sun using just your hands:
- Form a small hole by bringing your thumb and index finger together.
- With your back facing the Sun, examine the shadow of your hand on the ground.
- You will witness the Sun’s projection on the surface.
When observing a solar eclipse in the vicinity of trees, take note of the shadows cast by the leaves on the ground. Throughout the eclipse, the tiny gaps between the leaves will act as projectors, resulting in multiple depictions of the Sun on the ground. This indirect method of Sun observation is completely safe.
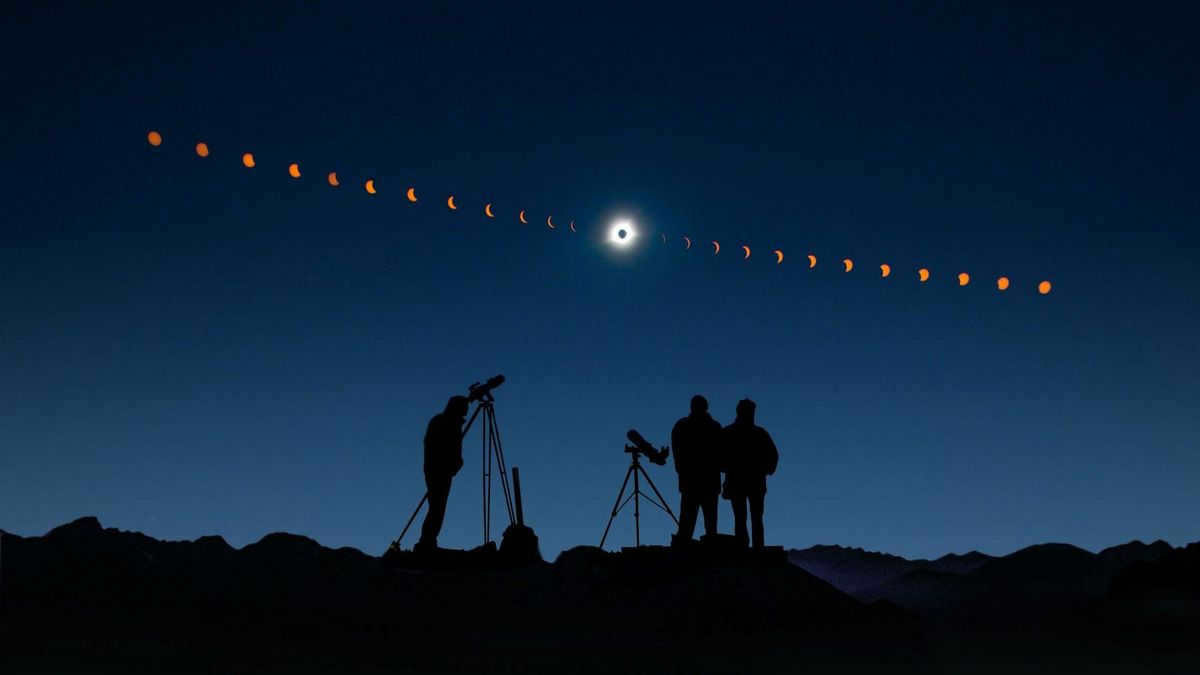
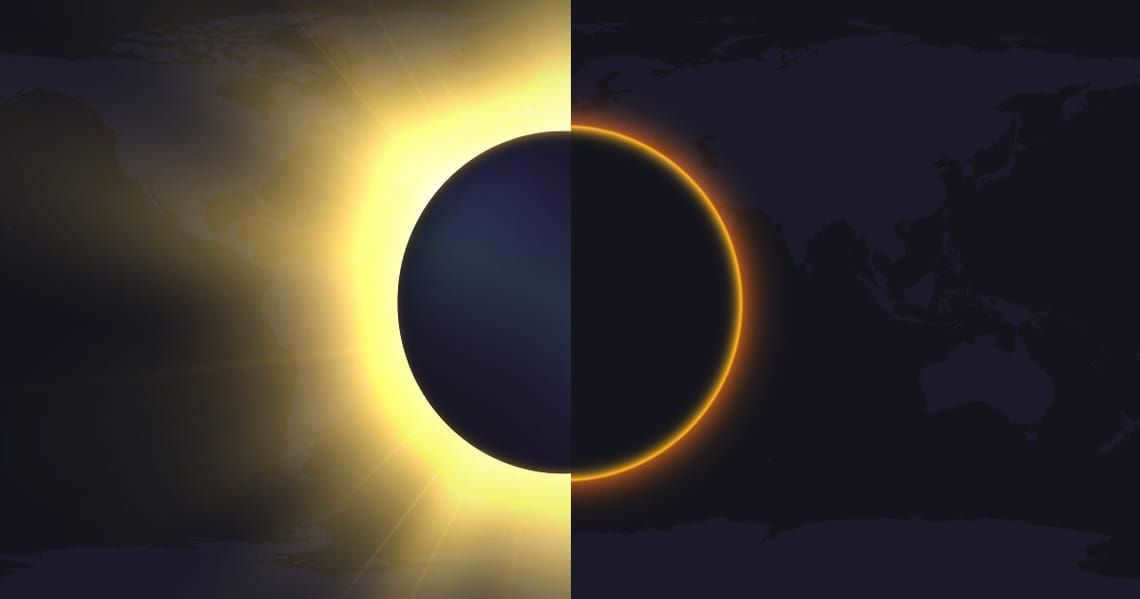
Ways to Witness a Solar Eclipse
Solar eclipses are extraordinary occurrences in the daytime sky, yet they are also incredibly rare. During annular eclipses, a radiant “ring of fire” encircles the Moon, while during total eclipses, a celestial corona emerges. Additionally, these events provide an opportunity to view the most brilliant planets and stars with the unaided eye. However, it is worth considering focusing solely on the solar eclipse itself, rather than diverting attention to other celestial phenomena.
For a comprehensive list of upcoming solar and lunar eclipses, complete with a timetable and visibility map, be sure to explore our vibrant infographic.
Here is a comprehensive list of upcoming solar and lunar eclipses, including the exact times and locations where they will be visible. Take a look to see if you will have the opportunity to witness the next eclipse!
Atmospheric Phenomena
In addition to the fascinating astronomical events, there are also various atmospheric phenomena that you can observe. The majority of these phenomena are unpredictable, which makes the experience even more exhilarating.
During the daytime, there are various atmospheric phenomena that can be witnessed:
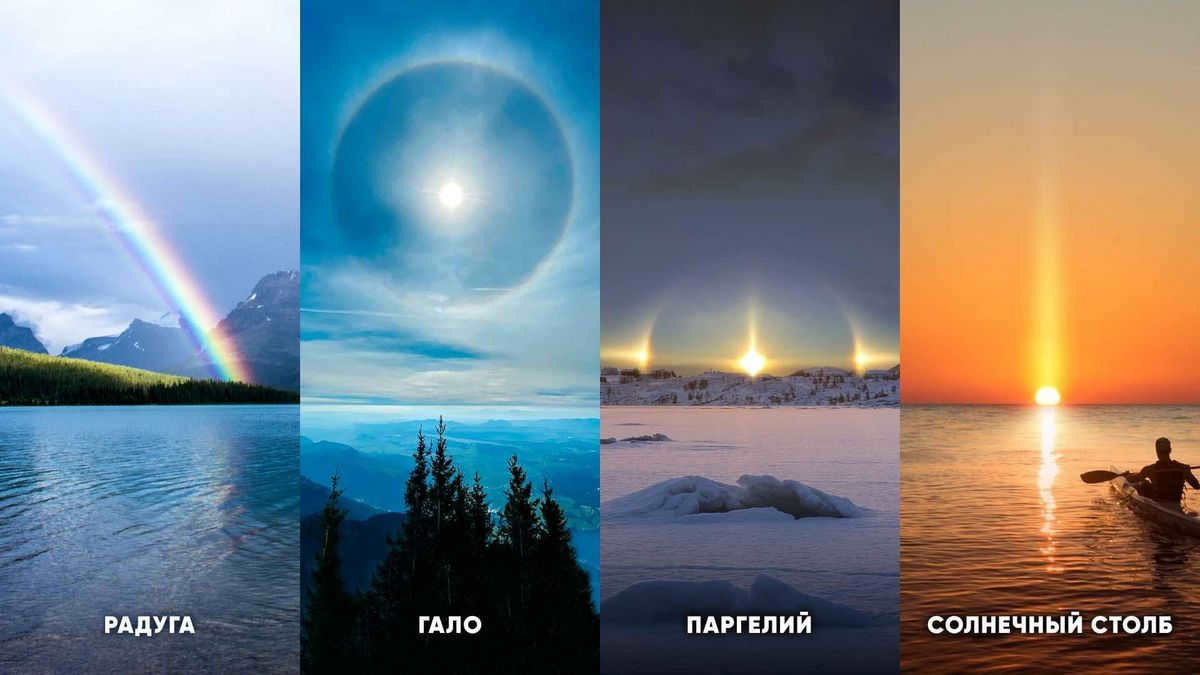
- A rainbow is the most commonly observed optical phenomenon resulting from the bending of light in water droplets;
- A halo is a circular band of light that forms around the Sun (or Moon) due to the refraction of light in ice crystals;
- A parhelion, also known as a “Sun with ears,” is a colored patch of light that appears on one (or both) sides of the Sun. It is caused by the refraction of light in ice crystals and is also referred to as a false Sun;
- A solar column is a vertical beam of light that extends upwards and downwards from the Sun (or any other bright light source). It is caused by the refraction of light in ice crystals.
Phenomena in the Atmosphere During Twilight
Below are a few examples of atmospheric phenomena that can be witnessed during the period of twilight:
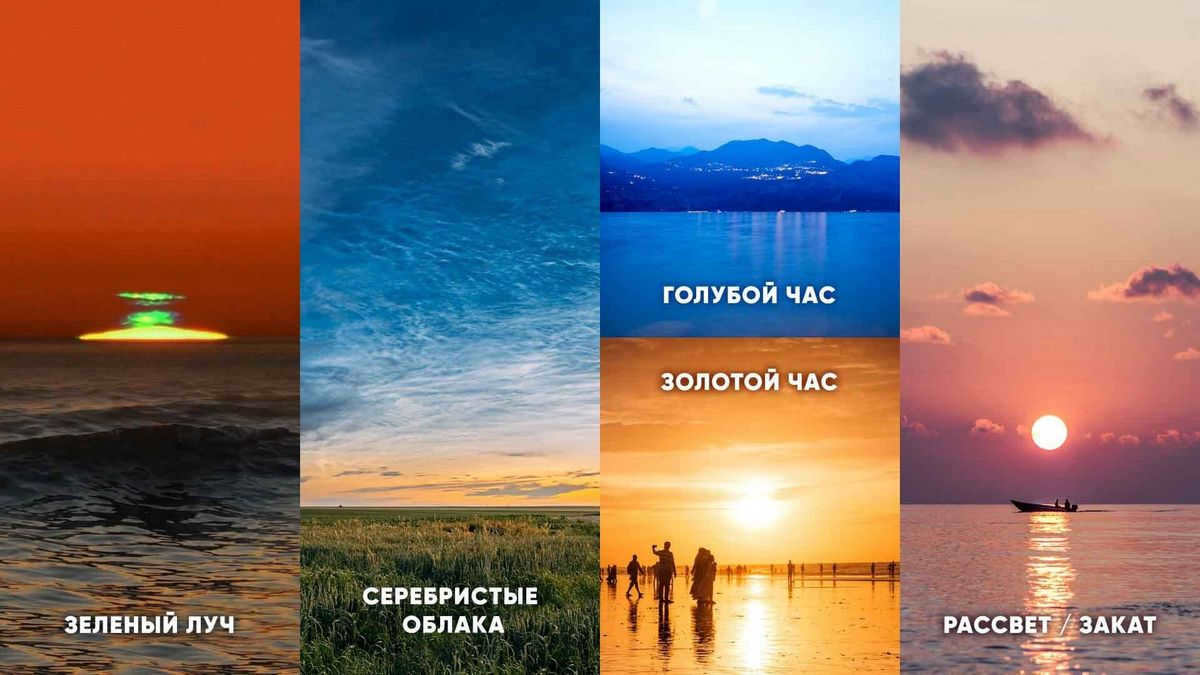
- Witness a stunning phenomenon known as the “Green ray” – a mesmerizing flash of green light that gracefully appears over the solar disk during sunrise or sunset;
- Marvel at the ethereal beauty of “Silver clouds” – delicate clouds that shimmer in a silvery or white-blue hue, forming in the upper layers of the atmosphere and becoming visible at sunset or dawn under specific weather conditions;
- Experience the enchanting “Magic Hours” – periods of twilight when the sky is adorned with hues of blue or gold, creating the perfect lighting conditions for photography enthusiasts;
- And let’s not forget the captivating allure of dawn and dusk themselves, which provide an extraordinary setting for observing celestial wonders and capturing them through the lens of astrophotography.